Comrade's Wargames

Painting toy soldiers in Oregon

  • Home
  • Narrative Campaigns
    • The Cauldron: A Grimdark Sci-Fi Campaign
    • The Chronicles of Üthdyn: A Fantasy Tabletop Campaign Setting
    • Nightwatch: Beyond the Borderlands
    • Frostgrave: Mystery of the Night-Haunted City
  • About Comrade’s Wargames

Fully Painted: Death Guard Plague Marines

Posted by Comrade on August 4, 2017
Posted in: Posts. Tagged: 40k, chaos, miniatures, painting, project, sci-fi, warhammer. 3 Comments

I finally finished painting the seven Death Guard Plague Marines from the Warhammer 40,000 Dark Imperium box set. All told, I probably spent 10 hours working on these seven figures — basically a speedpaint, for all intents and purposes.

This was my first brush with modern Games Workshop plastic kits, and I must say I was very impressed. The crisp sculpts and near-flawless fit of the individual pieces was really something. It was a far cry from the gloriously chaotic plastic-and-metal amalgams that characterized my first 40k army back in the mid-90s.

IMG_20170802_080832

After browsing the various warband paint schemes in the Death Guard handbook that came with the boxed set, I settled on The Weeping Legion, because I wanted to paint white armor and green trim for a change. I also liked the lore, with the Weeping Legion earning their name by marching to battle covered in the crusted ichor of their many weeping boils and pustules. Grandfather Nurgle approves!

As you can see from these pics, my Weeping Legion ended up quite a bit … eh … dirtier than the studio paint scheme. Chalk that up to the Minwax Antique Walnut polyurethane dip, which shaved hours off my painting time and also tinted the figures with a faint brownish hue. That was my intent, and it definitely fit with the fluff.

IMG_20170802_080716

I also had a great time playing around with color washes for the many tentacles, flesh pipes and leering tongues that festooned these figures. These sculpts are really a treat for the accomplished painter — guess I’d better go find one?! But I digress.

The Dark Imperium box set comes with 7 Plague Marines — 7 being the sacred number for Nurgle, of course — and GW recently released a 3-man box of Plague Marines to bring your unit up to full strength. So look for a few more Plague Marines to come in short order … or maybe I’ll get distracted by Poxwalkers … but I’ve also got some stuff on deck for my Night Lords. So much to paint, so little time!

40k Game Night at Wild Things Games

Posted by Comrade on August 3, 2017
Posted in: Posts. Tagged: 40k, demo, game night, sci-fi, wargames, warhammer. Leave a comment

Last month I trekked up to Wild Things Games in Salem for a 40k game night. Several of the regular players had picked up the new Dark Imperium boxed set, and we were itching to try out the game.

I don’t have detailed game reports to share — just a few photos showing the cool and varied armies that hit the table that night. A fun time was had by all! Browse the gallery below…

IMG_20170728_203540
IMG_20170728_203719
IMG_20170728_203126
IMG_20170728_203334
IMG_20170728_212027589


Caluphel: The Story So Far

Posted by Comrade on July 26, 2017
Posted in: Posts. Tagged: 40k, caluphel, campaign, narrative, project, sci-fi. Leave a comment

caluphel-planet-map-v3

We’ve been enjoying developing the backstory and evolving meta-plot for Caluphel Prime, our 40k campaign setting. With the release of the 8th edition of Warhammer 40,000, we’ve decided to update the campaign and bring it forward into the new Dark Imperium setting. We used this as an excuse to create a shiny new campaign map, too!

The new setting gives us the perfect vehicle for making such major story updates: the Cicatrix Maledictum, the galaxy-spanning warp storm that has split the Imperium asunder and ushered in a horrifying new chapter in mankind’s darkest age.

In the Caluphel system, the Great Rift erupted just as exploration of the newly rediscovered colony world was ramping up. Imperial explorator teams, joined by contingents from several Space Marine chapters, had established a few protected landing zones on the Caluphel’s surface. Opposing them were raiding parties of foul Traitor Legions as well as a vanguard from the inscrutable Tau. On the planet’s surface, advance recon teams were encountering nests of dormant Tyranids in the archeotech tunnels beneath major cities and outposts.

In short: all factions were jockeying for position on the planet’s surface even as they plumbed the depths of Caluphel’s mysteries.

All of that changed when the Great Rift — known variously as the Mouth of Ruin, the Warpscar and the Emperor’s Shriek — ripped the heavens asunder. For the fleets in orbit around Caluphel Prime, the effect was immediate and catastrophic. Massive landers and strike craft were tossed about on a roiling, churning tempest of raw warp energy.

blog-strike-cruiser

In an instant, the armies operating on Caluphel’s surface lost their orbital support, as the fleets were blasted to pieces by the raging energies pouring out of the Great Rift. Crippled ships spiraled down through smoke and flame to crash-land on the planet’s surface.

Two such ships — Strike Cruiser Tenacity, bearing elements of the Dorn’s Disciples Space Marine Chapter, and Troop Transport Gladius, carrying a newly raised regiment of Imperial Guard — managed to crash-land more or less intact. Their passengers disembarked and began endeavoring to link up with the rumored Imperial forces already operating on the planet.

The remaining factions on Caluphel went to ground, seeking shelter in bunkers, bombed-out buildings and subterranean chambers as the warp storm raged in the heavens. The conflagration lashed the Caluphel system for a full week … and then subsided, leaving only an eerie silence.

blog-battlefield-silence

When the hard-bitten survivors on Caluphel stepped out of their shelters and looked skyward, they didn’t see the familiar constellations of Segmentum Ultima. Instead, they saw the baleful glow of the Scourge Stars, and beyond that, the delicate spray of planets and stars of the Eastern Fringe.

It was almost impossible to comprehend, but it seemed that the Caluphel system had been pulled into the warp and relocated to the Eastern Fringe, near the borders of the Realm of Ultramar.

Within a few short days, their fears were realized. Frantic communications with other nearby Imperial listening posts confirmed that the Caluphel system had been deposited into a warp-torn section of space in the Eastern Fringe known as the Hadex Anomaly.

While the Imperials pondered the full, horrifying implications of this news, the Chaos Space Marines operating on the planet’s surface looked skyward and smiled. The Scourge Stars had recently fallen to the diseased legions of the Death Guard, and so the murderous Night Lords on Caluphel knew they would be getting reinforcements from their pustulent brothers soon enough.

Likewise, the Tau of the L’Ranna Company managed to pilot their craft down through the maelstrom and effect a hard landing on the planet’s surface. The mysterious xenos nodded solemnly and interpreted good omens in the planet’s relocation to the Hadex Anomaly. The hard-pressed Tau Empire was located relatively close by, and so the L’Ranna warriors looked forward to a reunion with their estranged cousins.

So that brings us into the current 40k storyline! The Hadex Anomaly seems like a good place for Caluphel, since it leaves open the door for more weird narrative shenanigans in the future. The location — near both the Plague Stars and the Tau Empire — is ideal for incorporating reinforcements as players add to their armies. We’re located in the lower right portion of the map, near the word “The” in “The Eastern Fringe.” (Click here for a bigger map image.)

40k-galaxy-shadowbox

Look for more new and exciting games in the future as we explore the new setting!

Grimdark Future: Ambush at Teknolog Pass

Posted by Comrade on July 21, 2017
Posted in: Posts. Tagged: 40k, caluphel, campaign, game night, grimdark, sci-fi, wargames. 3 Comments


IMG_20170719_204319

John and I got together recently for a quick weeknight game of Grimdark Future. After several games that verged on the larger side of things, it was nice to adjust our sites and aim for a smaller-scale skirmish. We stuck to 500 points, which is the suggested introductory game size for Grimdark Future.

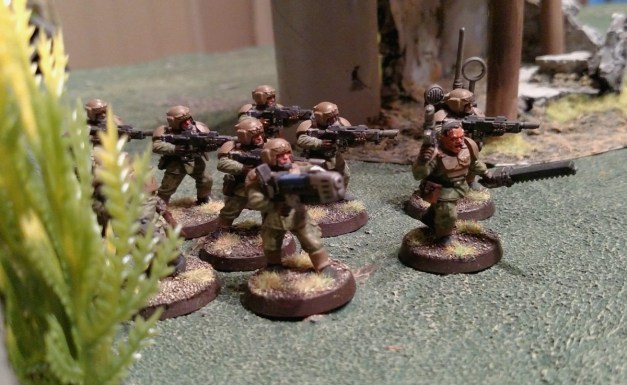
This game marked the arrival of John’s new Imperial Guard faction: the Shattered Regiment. In the Caluphel campaign narrative, these guys were the survivors of an ill-fated Imperial Guard regiment that had been dispatched to Caluphel, arriving in orbit at the precise moment that the galaxy-wide warp storm ripped the heavens apart. During the stellar conflagration, the Shattered Regiment’s ships were smashed asunder and sent plummeting through the atmosphere to crash-land on the planet’s surface. The handful of survivors who pulled themselves from the wreckage found themselves leaderless and alone on a hostile planet. The survivors are mostly grunts and conscripts, struggling to survive and link up with other Imperial units on the planet.

For our scenario, a group of Shattered Regiment troopers, under the leadership of the stalwart Lieutenant Dav Nolon, responded to a rally beacon that took their recon squads high up into the foothills of the Lower Norse Ring Mountains. The beacon appeared to be be centered on Teknolog Pass — a natural cleft in the mountains that included the remnants of an old Imperial listening station. The desperate survivors of the Shattered Regiment cautiously closed in on the distress beacon, unaware that their advance was being watched…

IMG_20170719_221002

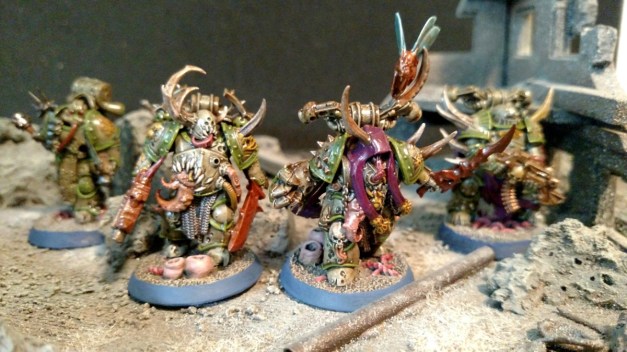
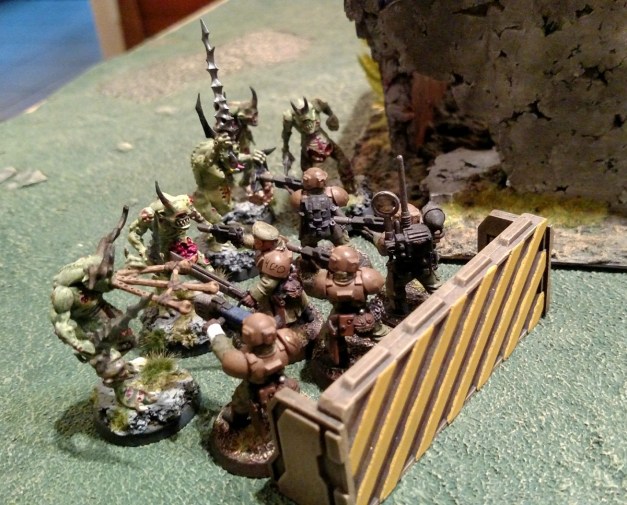
This game also marked the entrance of my new Plague Marine warband as well. I’m painting them up as The Weeping Legion. In this game, all Chaos units began the game in ambush (off the table, basically) while John’s Guardsmen began exploring the listening post.

As the Chaos player, I was quite nervous about my lack of tactical flexibility. I couldn’t control when my guys arrived on the table — and the odds were good that they would simply arrive piecemeal, unable to support one another.

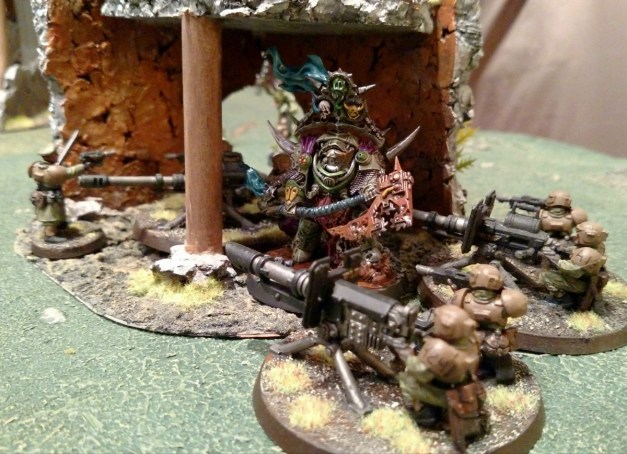
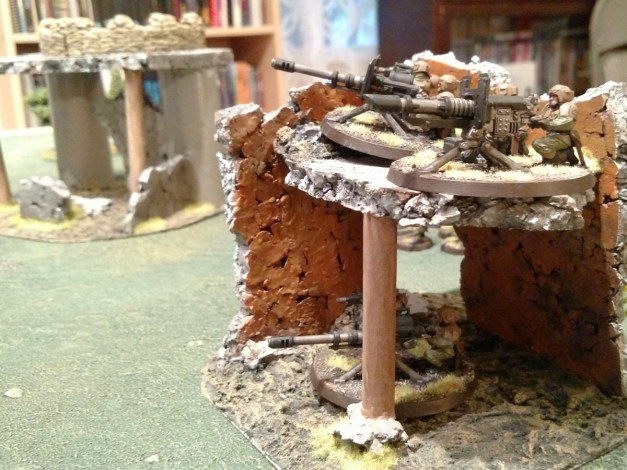
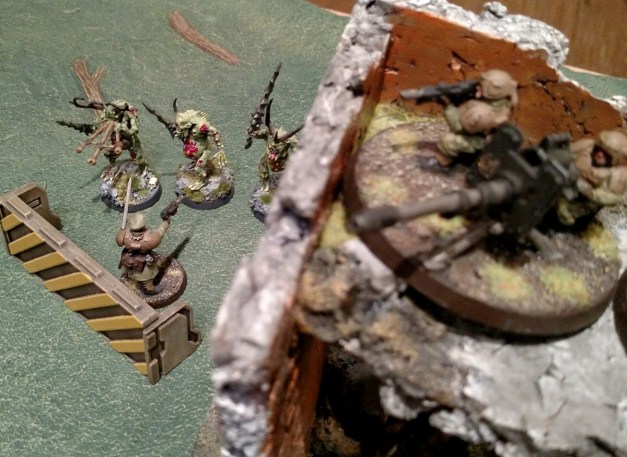
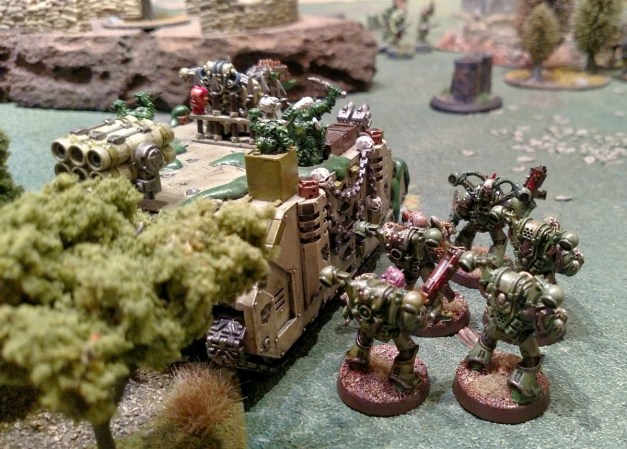
As the game got underway, John’s Shattered Regiment squads moved into a cratered area near the three objective markers. He had a “free turn” of movement, since my guys couldn’t start ambushing until turn 2, and he used this advantage to ensconce his heavy weapon team in a multi-level concrete building. As you can see, they had a commanding field of fire.

IMG_20170719_221826

On turn 2, I rolled to see who would arrive via ambush. I had marginal rolls and was able to deploy a 5-man squad of Plague Marines as well as a 5-man group of Plaguebearers, who immediately launched themselves toward a squad of squishy Guardsmen.

IMG_20170719_202632

They performed better than I had anticipated, and as a result John was forced to divert troops to deal with the Plaguebearers.

IMG_20170719_201819

With bad guys popping up everywhere, his squads hunkered down in the craters (the best place for Imperial Guardsmen, we agreed) and returned fire. Meanwhile, more of my guys arrived on subsequent turns. Here’s an overhead look at this guys (they’re in the craters, no doubt shooting at anything that moves).

IMG_20170719_221246

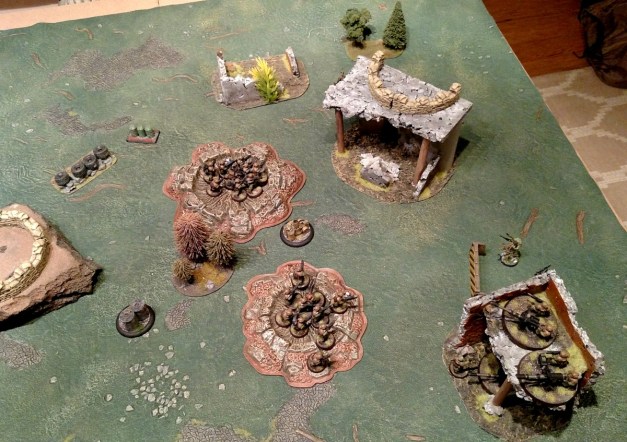
So where are the bad guys?

Answer: RIGHT BEHIND YOU.

With a lucky roll, I managed to summon Brasque Krakmarrow, Lord of Contagion, also known as the Grave-Wurm of Endymion-Delta and the Gift-Giver of Vortulai Hive, to the battlefield. He materialized next to John’s heavy weapons team and immediately began laying about with his fearsome tri-bladed axe.

IMG_20170719_204319


Yes, this is my newly painted Lord of Contagion model from the Dark Imperium boxed set. He is huge! And he was a lot of fun to paint.

Krakmarrow’s arrival proved to be a pivotal move. He didn’t kill any of the heavy weapon squads, but the brutal melee ensured that the teams could not use their firepower against any of the other squads that were ambushing the poor Imperials.

In addition to Lord Krakmarrow, I also go another squad of Plaguebearers, who went immediately into the fight.

IMG_20170719_202651

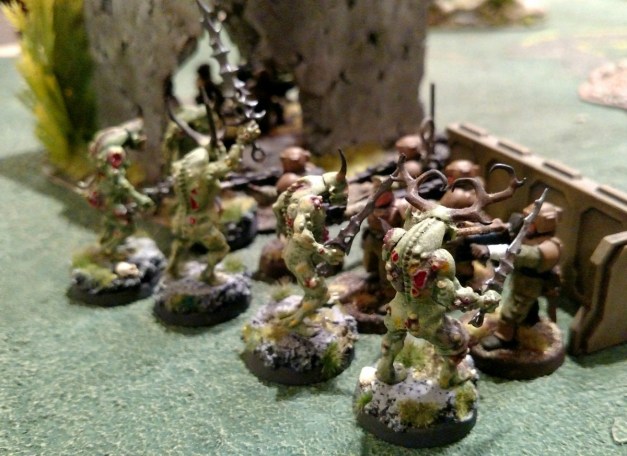
Around this point, we realized just how tough Plague Marines are. In Grimdark Future, they’re defense 7+, which means that you must roll a 6 followed by a 4+ on two successive dice to kill them, unless you have an armor piercing modifier on your weapon.

John’s most potent armor-piercing weapons were unfortunately tied up in Lord Krakmarrow’s swirling melee, so he was unable to bring his best guns to bear on the shuffling, noisome Plague Marines that continued to burst out of the highlands.

IMG_20170719_221617

Even as John’s Guardsmen fell to the withering bolter fire of the Traitor Marines, Lt. Nolon found his fury. The plucky junior officer raised his power sword and charged the fearsome Lord Krakmarrow (who by that point had been “softened” by several short-range lascannon blasts).

The two combatants dueled in the rarefied air of Teknolog Pass, landing massive blows that caused the very ground to crack asunder beneath their feet. 

IMG_20170719_221459

Ultimately (and by the Emperor’s grace, for sure) Lt. Nolon landed a fatal blow — but even as Krakmarrow’s hulking form crumpled to the ground, a foul gaseous vapor swept through the battlefield and spirited the broken warrior away, presumably to live and fight another day.

In game terms, Nolon defeated Krakmarrow in single combat! Huzzah! But of course Krakmarrow is not truly dead, just temporarily defeated…

But by this point it was clear that the rest of the Plague Marines were going to mop the floor with the remaining Guardsmen. We decided that Nolon’s epic showing had given the remaining squads an opportunity to reach the rally beacon and broadcast a critical message to the rest of the Imperials on Caluphel — requesting aid, and also advising them of the new threat posed by the Plague Marines.

The Weeping Legion, for their part, were able to capture some survivors, and we’re already planning a follow-on scenario where the survivors are rounded up to be used as sacrificial lambs for a foul chaos sorceror’s blood rituals. Did the Shattered Regiment’s plea for help reach anyone? Who will respond and attempt to stop the ritual? Stay tuned to find out!

40k Battle Report: The Big Guns Never Tire

Posted by Comrade on July 11, 2017
Posted in: Posts. Tagged: 40k, campaign, game night, sci-fi, wargames, warhammer. Leave a comment

IMG_20170709_215343

Now there’s a fitting name for a battle report! Indeed, as the title suggests, Paul and I met up for a game of 40k. Specifically, we decided to play the scenario entitled “The Big Guns Never Tire.”

In addition to being inspired by one of my all-time favorite little snippets of 40k lore, this scenario was also a great opportunity for Paul and I to get two of our newly painted centerpiece models — a Tau Riptide for him and a Chaos Land Raider for me — onto the table for a thematic game.

So we set up a quick narrative scenario — the Tau and the Night Lords were picking through the ruins of Saint Scythia (one of the urban areas on Caluphel Prime) and came upon an abandoned defensive line. Both armies were determined to station their heavy support units on the high ground.

IMG_20170709_214850

IMG_20170709_214647

This game marked our second outing with Warhammer 40,000: Dark Imperium, also known as 40k 8th edition. We played this game at 75 Power Level but still didn’t feel like we got our “full armies” on the table.

The battlefield, with its ruined defensive earthworks bisecting the table, created some interesting tactical decisions. Clearly the Tau would have to pull off a successful flanking maneuver in order to bring their long-range weaponry to bear. For my part, I was looking forward to trying out some newly painted Khorne Berzerkers and Plague Marines in my army.

IMG_20170709_214744

The game itself turned out to be something of a curb-stomping of the Night Lords by the Tau. I was outgunned in every sense of the word. I consistently found myself in situations where a half-squad of 5 Chaos Marines would be facing down a 10-man squad of Fire Warriors at short range, resulting in Paul rolling 20 or 30 dice to attack.

To make matters worse, I dramatically underestimated the potency of Paul’s Crisis Suits. He had three, and each was an absolute menace when arriving via orbital insertion in my backfield.

And lastly, I just didn’t know enough about tactics for this new edition of 40k. Neither of us did, really, but Paul was able to gain the upper hand through sheer firepower and win the day.

The game started with Paul conducting a very smart flanking move with his Devilfish and a squad of Fire Warriors. They landed on a ruined building near a squad of Night Lords, proceeded to annihilate them and then march down my left flank in workmanlike fashion.

IMG_20170709_214957

You can see the ruined building with the stairs in the photo above. It’s a long, narrow multilevel fortification, probably 30 inches in length, with two objectives on either end. I sent a squad of cultists into this ruin to claim the first objective, and Paul countered that move by sending in his newly acquired Kroot squad! They were so new that I think they still had packing peanuts stuck to them from eBay.

IMG_20170709_215238

Farewell, cultists!

Nearby, two Chaos squads (5 Night Lords and 5 Plague Marines, plus a Rhino APC) found themselves hemmed in by the approaching Fire Warriors and the Devilfish.

IMG_20170709_215711

This was literally a case of them being caught in the open, and the results were brutal. They went down firing, but these guys were doomed from the start…

I made marginally better progress on the right flank. Whether by chance or due to an unconscious desire to pit our two newest toys against each other, both my Land Raider and Paul’s Riptide had been deployed opposite each other on the battlefield. So it made sense for them to spend most of the game pouring firepower into each other. Which nut would be the first to crack?

IMG_20170709_215157

Spoiler: It was the Land Raider! Thanks in no small part to the timely arrival of a couple of Crisis Suits from their orbiting Manta transport. The Land Raider took a lot of punishment but it couldn’t stand up against a Riptide and a pair of Crisis Suits.

IMG_20170709_215757

Before the Land Raider burned up, I was able to disgorge its payload — a snarling band of Khorne Berzerkers, along with my newly painted Chaos Lord astride a fearsome Juggernaut!


They looked impressive, no doubt about it, but close combat has changed in 8th edition. You’re no longer “stuck in” when you enter close combat…now, units can withdraw at any time and for seemingly little penalty. Mechanically, this encourages lots of charges and countercharges (which is fun!), rather than one big game-ending morass.
Anyway, the Berzerkers charged and did some damage! But those darn Crisis Suits have 6 wounds, and I wasn’t able to kill even one.

Sidenote: Overwatch is brutal in 8th edition! Any unit can shoot with all its weapons, and even though you only hit on 6’s, it all adds up, particularly with units that have a lot of firepower that improves considerably at close range.

Which brings us to the final indignity of the night …

IMG_20170709_215616

This was the final act for my vaunted Chaos Lord in Terminator armor. The caption here could probably be best summed up by, “What’s that? He’s behind me?”

What actually happened was that my Chaos lord arrived via teleport to seize and objective (that sweet chaingun-looking thing behind him). Paul sent in a lone Crisis Suit to take him out, and to my utter surprise the Chaos Lord weathered a full round of shooting and survived.

So on my turn I gleefully prepared to charge — and was utterly annihilated by a series of lucky overwatch rolls. Yep, there is no dignity, not even in death.

At this point I had just a handful of units on the table, so I gallantly conceded.

Conclusions

It was interesting to re-examine my unit choices after such a sound defeat. In this case, I had left my two units equipped with deep strike — a squad of Chaos Terminators and a squad of Raptors — on the bench, as I wanted to play with my shiny new Plague Marines and Berzerkers.

But in this case, I think those would have been points well spent. The ability to threaten Paul’s flanks would almost certainly have changed his battle plan.

In addition, next time I’ll play to the Tau’s weakness in addition to my own strengths. Namely, the psychic phase — Tau don’t have access to psykers, so this is essentially a “free roll” for most other armies, provided they take advantage of it. I’ll be bringing a few Chaos Sorcerers next time to see how they go.

Lots more units and tactics to try out in future games…stay tuned!

Posts navigation

← Older Entries
Newer Entries →
  • Recent Posts

    • Building a Grimdark Battle Board
    • Hobgoblin: More Thoughts and Musings
    • Grimdark Future: The Scouring of Hundvolst
    • Shadow War: Armageddon Battle Report & Review
    • The Expedition Soldiers On
  • Follow Comrade's Wargames on WordPress.com
  • Tags

    28mm 40k army battle report caluphel campaign chaos club death guard dragon rampant dwarves fantasy game night grimdark hobby miniatures narrative nurgle painting post-apoc project saga sci-fi skaven skirmish terrain warbands wargames warhammer workshop
  • Archives

    • January 2026 (1)
    • November 2025 (1)
    • October 2025 (2)
    • September 2025 (1)
    • October 2023 (2)
    • September 2023 (1)
    • August 2023 (2)
    • July 2023 (3)
    • June 2023 (3)
    • May 2023 (4)
    • April 2023 (2)
    • March 2023 (5)
    • February 2023 (2)
    • January 2023 (2)
    • December 2022 (1)
    • November 2022 (1)
    • October 2022 (4)
    • August 2022 (2)
    • July 2022 (1)
    • June 2022 (2)
    • May 2022 (5)
    • March 2022 (1)
    • February 2022 (1)
    • January 2022 (3)
    • December 2021 (1)
    • November 2021 (2)
    • October 2021 (1)
    • September 2021 (2)
    • July 2021 (1)
    • June 2021 (1)
    • May 2021 (2)
    • March 2021 (3)
    • February 2021 (1)
    • January 2021 (3)
    • December 2020 (1)
    • October 2020 (1)
    • September 2020 (2)
    • August 2020 (1)
    • July 2020 (1)
    • June 2020 (1)
    • May 2020 (1)
    • April 2020 (1)
    • March 2020 (1)
    • February 2020 (2)
    • January 2020 (3)
    • December 2019 (5)
    • November 2019 (1)
    • October 2019 (1)
    • September 2019 (2)
    • August 2019 (2)
    • July 2019 (4)
    • June 2019 (3)
    • May 2019 (3)
    • April 2019 (1)
    • March 2019 (1)
    • February 2019 (2)
    • December 2018 (3)
    • November 2018 (3)
    • October 2018 (5)
    • September 2018 (5)
    • August 2018 (5)
    • July 2018 (5)
    • June 2018 (2)
    • May 2018 (1)
    • April 2018 (3)
    • March 2018 (1)
    • February 2018 (1)
    • January 2018 (1)
    • December 2017 (1)
    • November 2017 (5)
    • October 2017 (1)
    • September 2017 (2)
    • August 2017 (4)
    • July 2017 (4)
    • June 2017 (3)
    • May 2017 (4)
    • April 2017 (3)
    • March 2017 (7)
    • February 2017 (6)
    • January 2017 (2)
    • December 2016 (5)
    • November 2016 (2)
    • October 2016 (3)
    • September 2016 (4)
    • August 2016 (5)
    • July 2016 (6)
    • June 2016 (8)
    • May 2016 (2)
Create a website or blog at WordPress.com
Comrade's Wargames
Create a website or blog at WordPress.com
  • Subscribe Subscribed
    • Comrade's Wargames
    • Join 154 other subscribers
    • Already have a WordPress.com account? Log in now.
    • Comrade's Wargames
    • Subscribe Subscribed
    • Sign up
    • Log in
    • Report this content
    • View site in Reader
    • Manage subscriptions
    • Collapse this bar
 

Loading Comments...