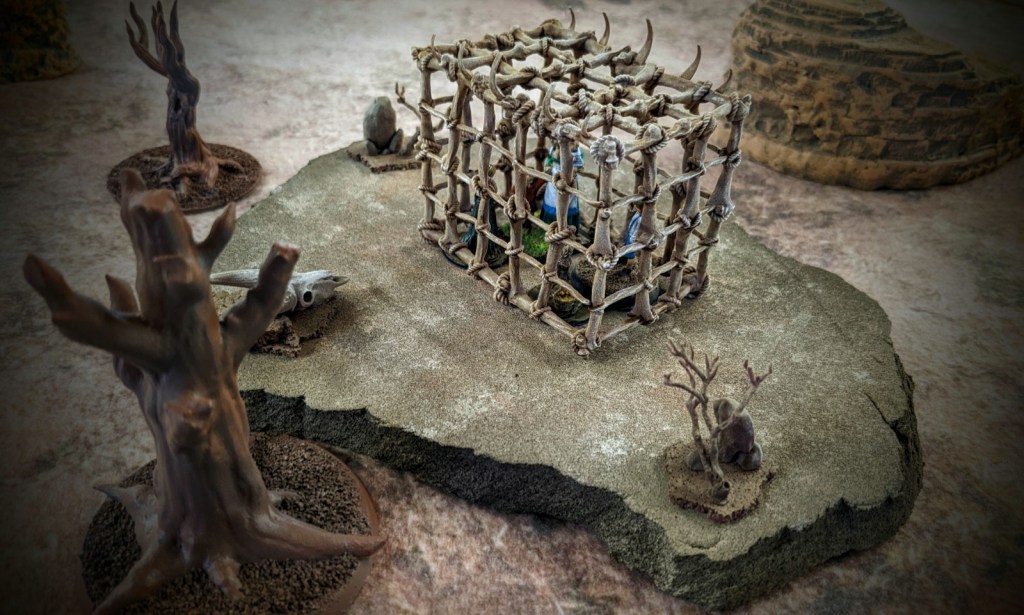
Perched atop a desolate slab of rock stands a cage. Crafted from sun-bleached bones and tied with dusty scraps of sinew and skin, the cage exudes a kind of forlorn solitude. Travelers are wise to give the bone cage a wide berth if they are forced to traverse the wind-scoured desert of the Hattendorf Border Marches. Those who dare to venture close enough may hear faint cries emanating from within the tattered enclosure…
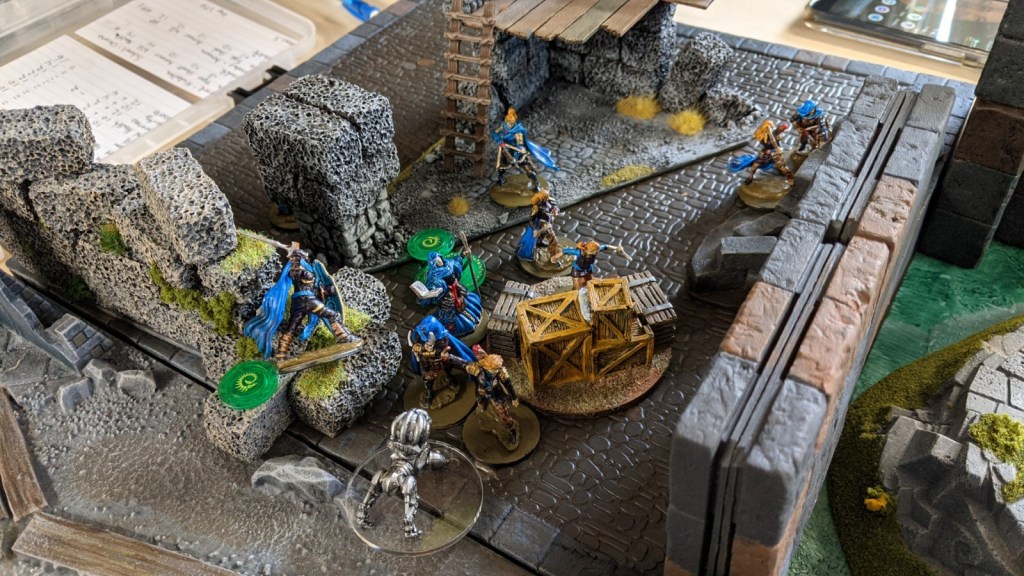
We played our third game of Nightwatch back in late August, but I haven’t gotten around to doing a writeup until just now. The game was centered around a grisly terrain piece that John printed and painted up just for this occasion — the titular bone cage, wherein the beastmen of the border marches had stashed a few sad, whimpering children kidnapped from Heerselt Manor.
How terrible! If only there were some hunters, blooded from recent battles and increasingly capable of tackling the worst that the border marches could throw at them! Where, oh where, could we find such heroes!
Ah yes. They’re here, at this very place, to attempt the very deed I just described.
If the first two sessions were characterized by caution on the part of the hunters, this session could be characterized instead by competence from the hunters. By this point they were experienced, well equipped, accompanied by a few hand-picked allies, and generally ready to accomplish their mission.
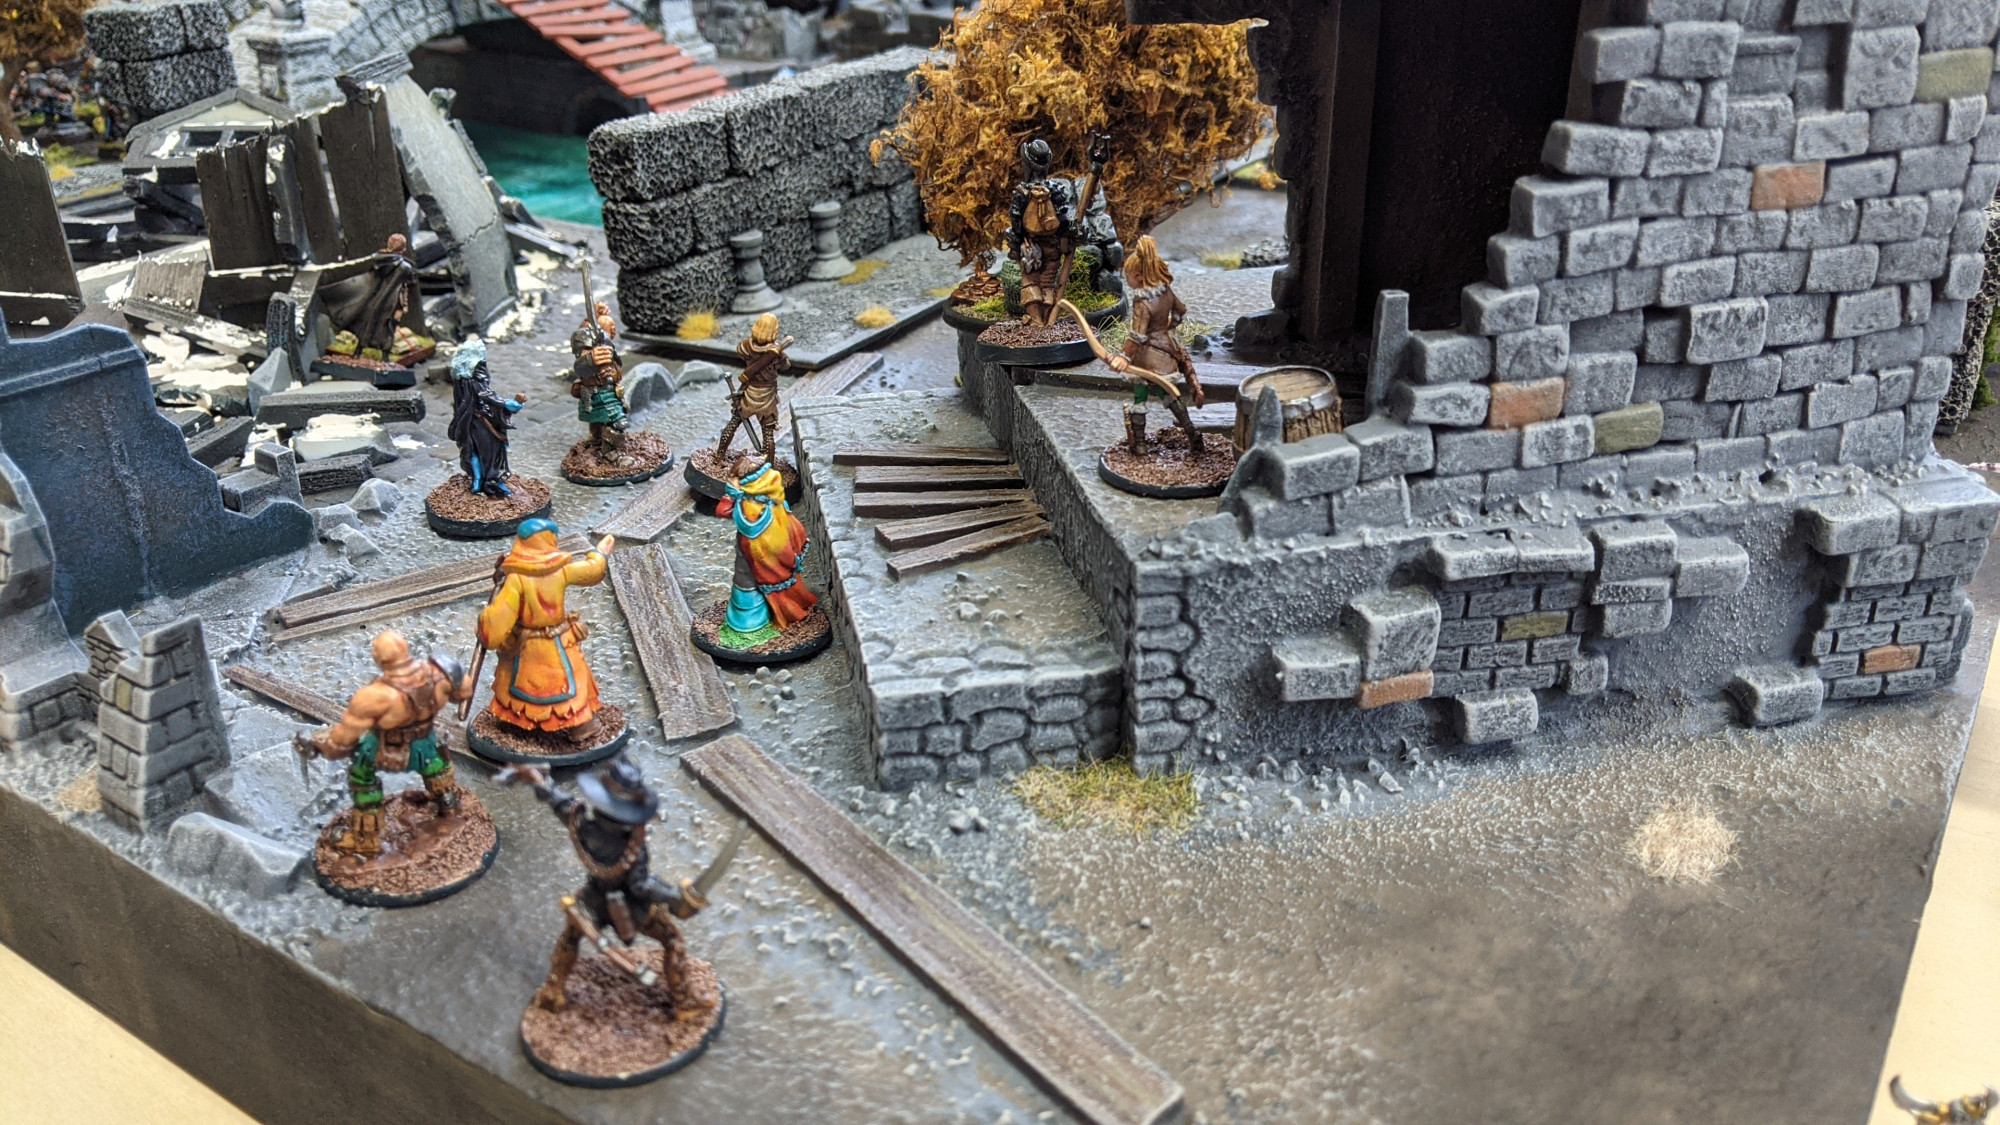
Our Nightwatch battlefield was still quite small, around two feet square, which meant that the hunters were able to quickly get into position to pick the locks on the bone cage. This task took multiple turns, and the rest of the warband had to fight off waves of beastmen and gnoll raiders who swarmed out of the nearby canyons.
As I mentioned earlier, this was a seasoned, competent bunch of players. They knew their characters and had a pretty good sense of how to stymie the beastmen raiders. Their overall goal was to keep the beastmen at bay until they could pick the lock on the bone cage – hopefully before the threat level ratcheted up in the later turns of the game.
The beastmen swarmed in, and the bodies started hitting the floor. The characters had nifty weapons and spells at their disposal, and the low-level beastmen who arrived in the early turns were ground up into hamburger by a flurry of lightning bolts, alcemical grenades, sword parries, and longbow shots.
I’m pleased to report that the players’ plan went off without a hitch. They were able to manage the emerging beastmen threat while simultaneously jimmying the lock on the bone cage. They ripped the doors open at precisely the right moment, just before the threat level was scheduled to ratchet up.
I’ll admit I was extremely interested in deploying some of the more menacing beastmen monsters that we had assembled for this game, but those guys will have to wait until the next session. Until then – you win this round, heroes!!
The next scenario in our Frostgrave campaign was straight out of the second edition rulebook: The Silent Tower!
“Frostgrave has many dangerous places, yet few are as notorious and feared by wizards as this tower. A null-field, it negates all magic, leaving spellcasters powerless and vulnerable. Only the most daring and reckless dare to venture inside – their bodies rest quietly on the damp floors and stairs of the Silent Tower.”
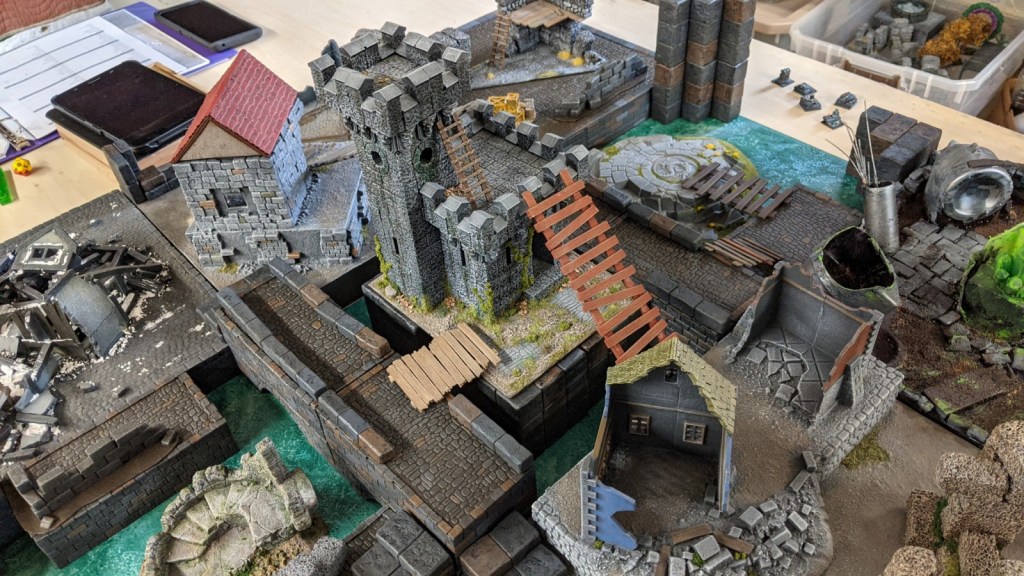
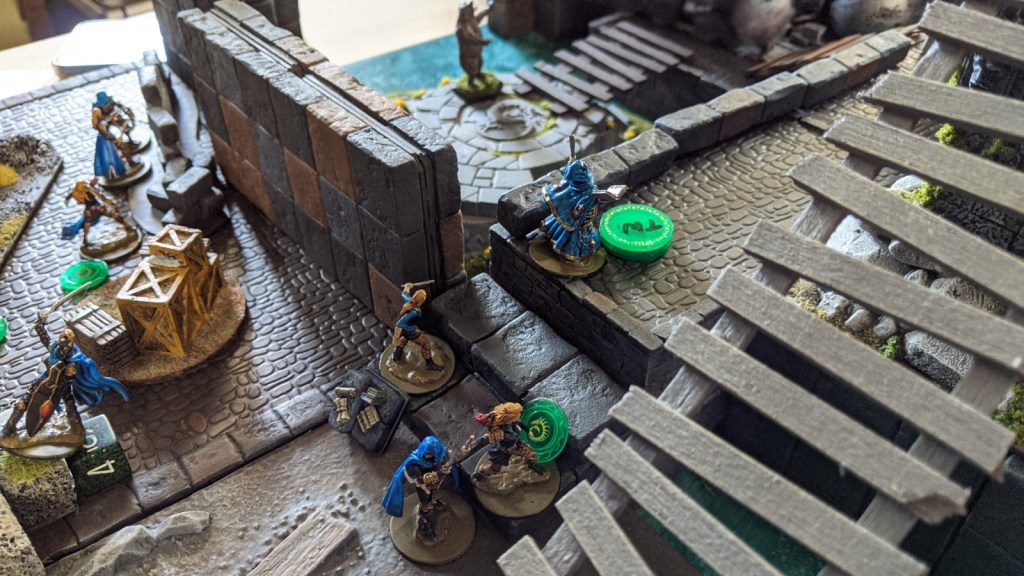
By this point in our campaign, several of the warbands had a few games under their belts and were starting to improve their wizard, learn new spells, and hire better soldiers. We set up a battlefield featuring the titular tower in the center of the table, plus plenty of narrow alleys, creaky ladders, and crumbling ruins.
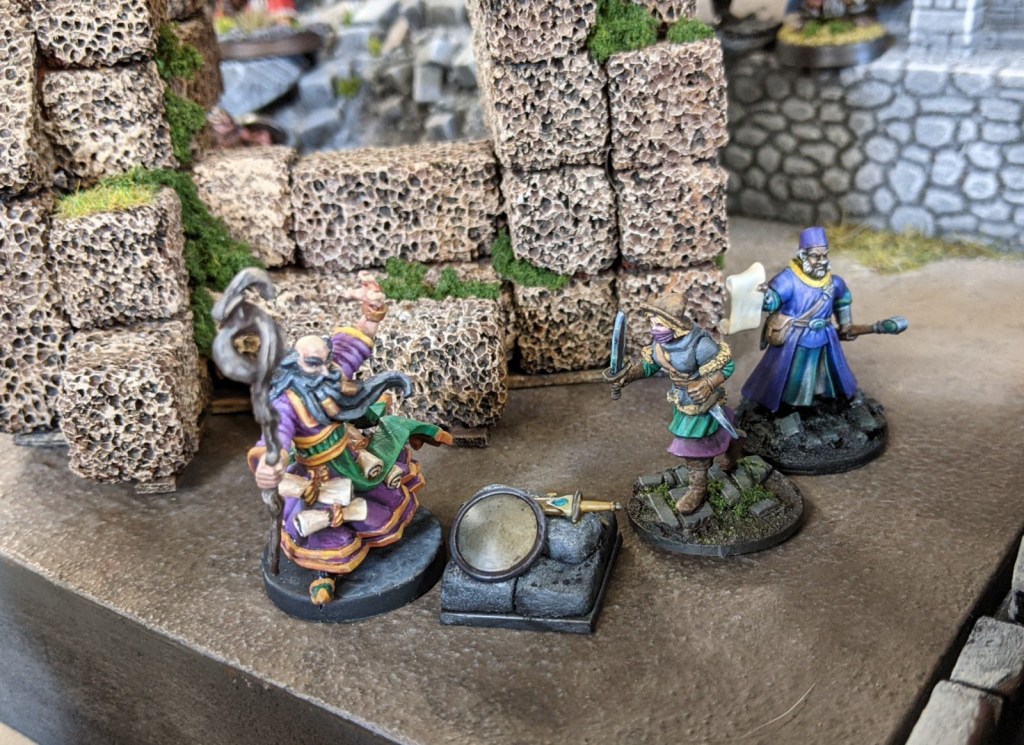
Here’s a look at the warbands: my dwarven enchanter, John’s sigilist, Mark’s chronomancer, and Vincent’s summoner.
The goal of the scenario was to pay a visit to the Silent Tower; warbands could claim experience points for sending their wizard or their apprentice (or both, for maximum value) into the tower. Of course, this positioned the tower as the most dangerous spot on the whole battlefield.
Luckily, the scenario also included a number of treasure tokens scattered around the battlefield. In the opening turns, the warbands angled to scoop up this loot on their way toward the central tower.
The cluttered tabletop meant that we could snake through the ruins and avoid enemies … for a while, at least.
After picking up a treasure token, there’s a chance that a wandering monster will appear, providing more opportunity for danger and reward. This is one of the most satisfying components of a game of Frostgrave … wandering monsters add a ton of fun to our games. For this game, we had a big ol’ whiteboard set up next to the game table, and we jotted down the stats of each critter as it arrived, so we could all easily reference this info as we planned our turns.
The first unwelcome guest was a Large Bear that arrived within striking distance of John’s warband led by his sigilist.
John was bear-ly able to evade this marauding ursine, which proved too dangerous to truly ignore even as his warband crept closer to the Silent Tower.
Elsewhere, a pair of constructs clattered out of some buried ruin and moved to menace Mark’s chronomancer. The constructs went down with a clang and Mark notched some more XP in the process.
Vincent used his Leap spell to catapult a hapless soldier atop the Silent Tower itself. The tip-top portion of the tower housed a particularly potent treasure token, and we all wanted it! Vincent got there first, which set off a frantic scramble. I think someone else used another spell, maybe Push, to dislodge the soldier before he could claim the treasure.
My dwarven warband found itself in a running battle along an elevated walkway leading to the tower entrance. Even as we were fighting on the ground, Vincent was using Leap to toss more fighters up to the parapet.
Elsewhere, the wandering monsters continued to pop up where they were least expected. Vincent’s warband suddenly found itself toe-to-talon with a ghostly ice wraith.
The Large Bear continued its plodding advance, drawing the attention of Mark’s warband as they closed in on the Silent Tower.
One of the most entertaining aspects of Frostgrave is how a particular terrain piece can be the focal point for a mini-narrative. In our case, a narrow stone ledge proved to be a nearly insurmountable obstacle when I placed a solitary dwarf thief atop it as defender. (He’s the guy with the candle on his helmet in the image below.)
This stout defender repeatedly repelled assaults by individual soldiers in John’s warband, tossing them off the ledge, one after the other. Eventually the dwarf defender was pulled down and stabbed to death by the enraged warriors of John’s warband. It was a good warrior’s death!
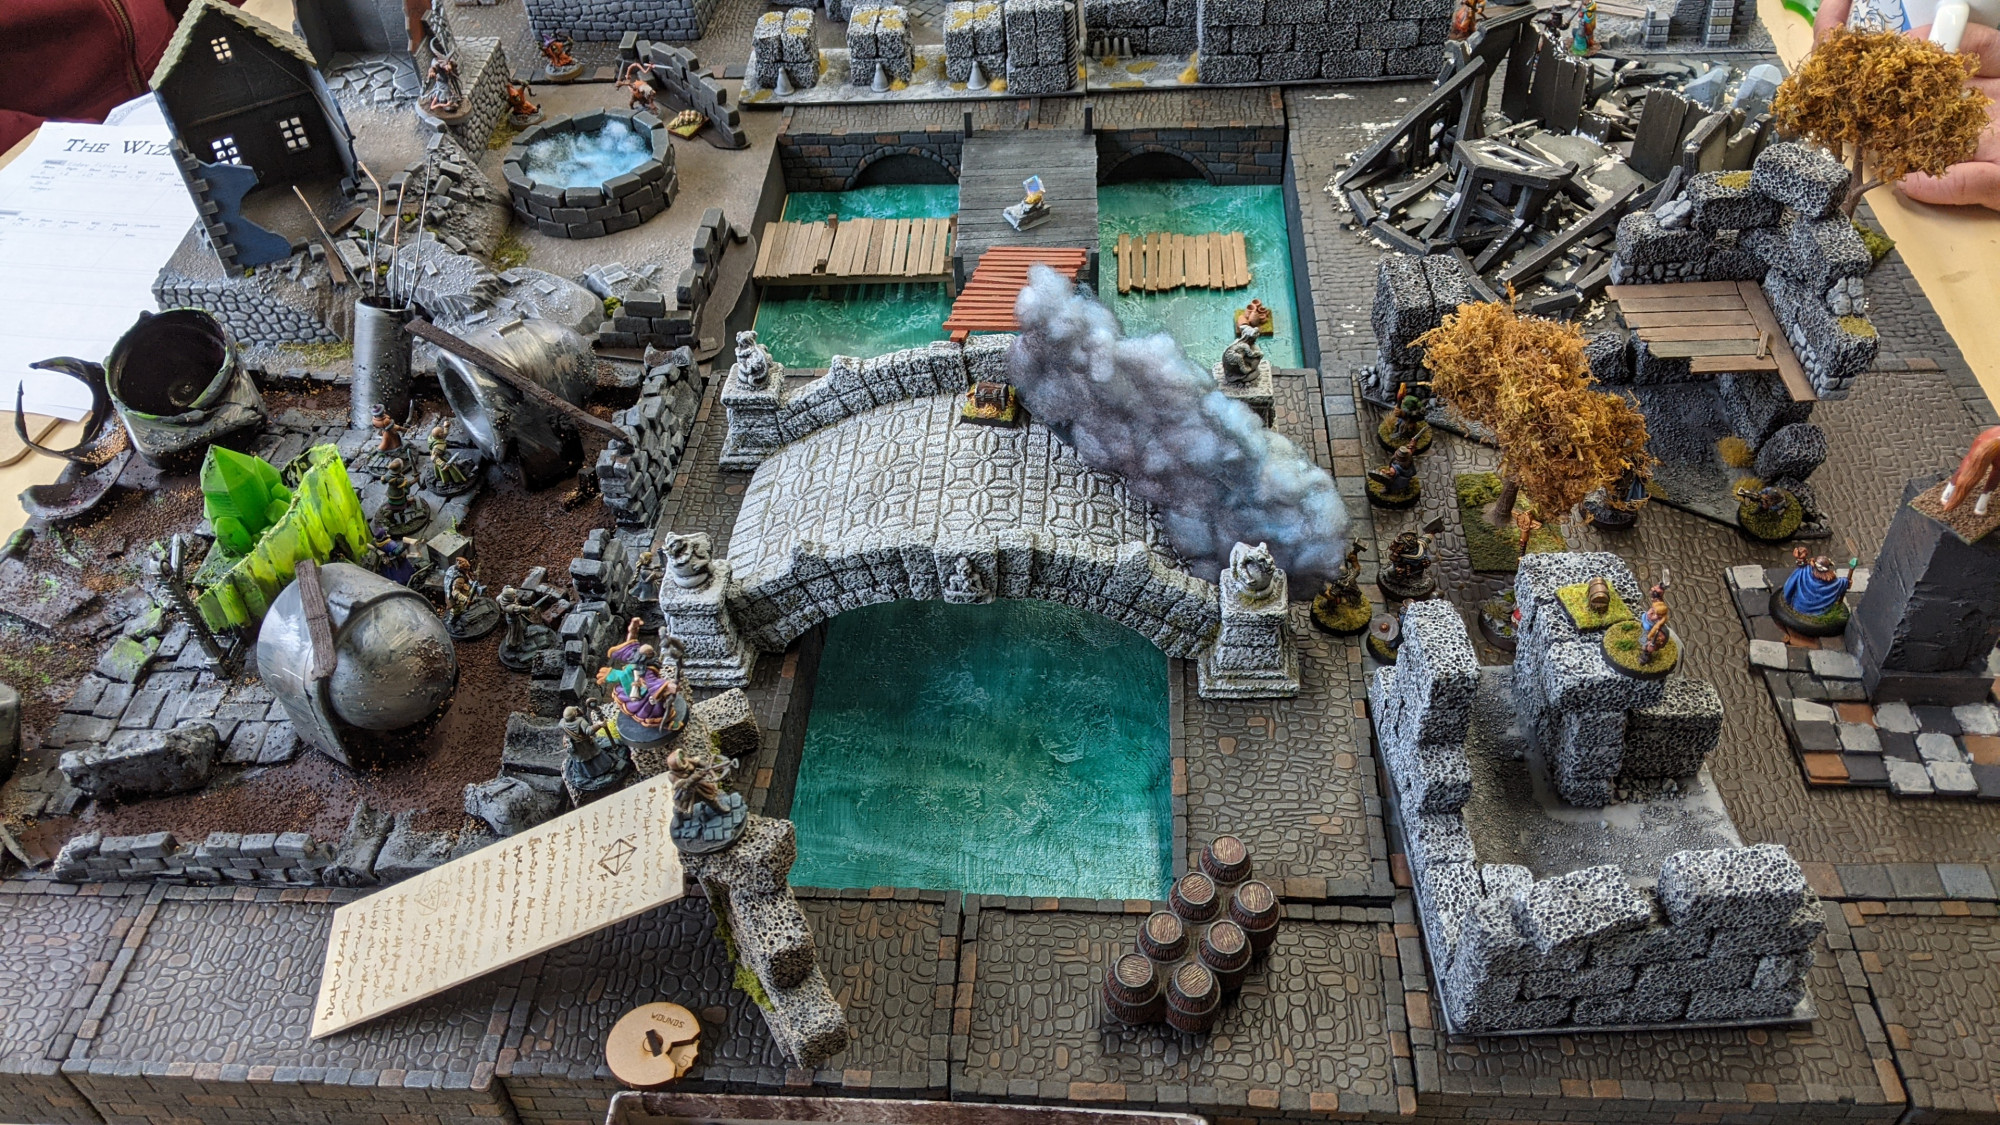
Here’s a look at the battlefield as we entered the final turns. Mark’s warband was making an all-out push for the Silent Tower. Vincent and I were battling it out on the walkway just outside the tower. John was screening his warband from the marauding bear with a well-placed Wall spell.
Ultimately I was able to batter my way into the Silent Tower with a bloodthirsty dwarven man-at-arms, who proceeded to dash up the stairs just as Vincent’s wizard leaped up to the highest parapet. You can see John’s Bridge spell creating a convenient entry point for his warband in the images below.
The man-at-arms met Vincent’s summoner in single combat and we were once again reminded that wizards generally have fairly weak combat stats. The man-at-arms cut down the wizard in a ghastly turn of events for Vincent. But the dwarf wasn’t quite able to claim the treasure token before the game ended.
In the final turn of the game, Mark’s gambit paid off, as he was able to rush his wizard and apprentice into the tower to claim the XP bounty. Good job, Mark!
And John made a big show about securing the treasure token that my poor sad little dwarven thief had been defending. Why would he do that? There’s been enough senseless butchery for one day, John. But I’ll let you have this moment of victory.
You’ll be pleased to hear that Vincent’s wizard didn’t actually die … he rolled on the casualty table and got a favorable result, as I recall. But still — it was a gutwrenching moment indeed when his wizard fell in combat atop the parapet.
What’s that? You’d like to see another photo of the moment when the summoner met her untimely end?? It seems I cater to utter savages on this gentle blog. But I acquiesce to your demands. Give the people what they want, that’s what I always say. Behold, the carnage on the battlements!
This was our third campaign game, and things were really humming along from a gameplay perspective. Our warbands are advancing and we’re finding new/cool/weird loot in the ruins of Felstad. We’re also taking a deep dive into our miniatures collection to come up with all of the skeletons, wraiths, boars, spiders, constructs, and Large Bears required to fully embrace the wandering monster table. Stay tuned for more!
We got together last month for the first session of our Frostgrave campaign. This game was the culmination of months of planning, building, and painting! Everybody contributed to the terrain board, and everyone had newly painted models to show off for the game. We also did some worldbuilding via Microscope to develop a customized backstory and lore for our version of Felstad. Good stuff!
We had a tremendous setup for the game: John’s large, covered, well-lit back porch, which kept Oregon’s winter rain off our heads and enabled us to play outdoors and stay as safe as possible during ye olde pandemic. We also wore masks, of course.
Since this was our first game, we went with the basic scenario: a ruined section of the frozen city stocked with treasure and danger in equal parts. The table size was slightly bigger than 3×3 feet, which was a bit tight for 4 players, but we made sure to pack the battlefield with terrain, so there were plenty of cramped alleys and irregular ruins to negotiate.
The game began with us re-learning the mechanics and introducing them to the newer players. Each warband deployed in a corner and began a cautious advance toward the nearest treasure tokens. Some treasures were closer than others, which put some warbands at an advantage at the outset of the game. Here’s a look at the warbands… the images should be clickable to see slightly larger versions.
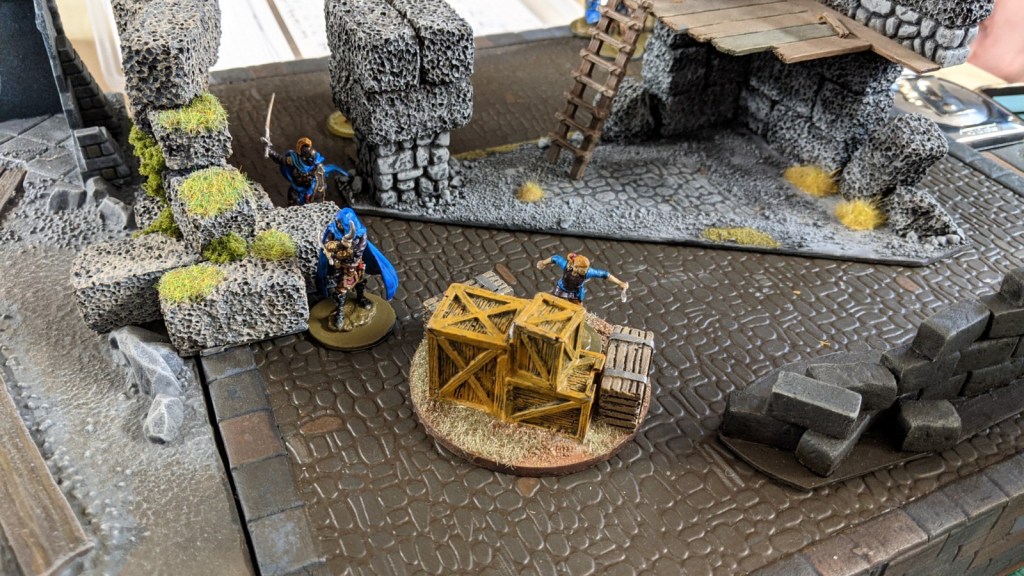
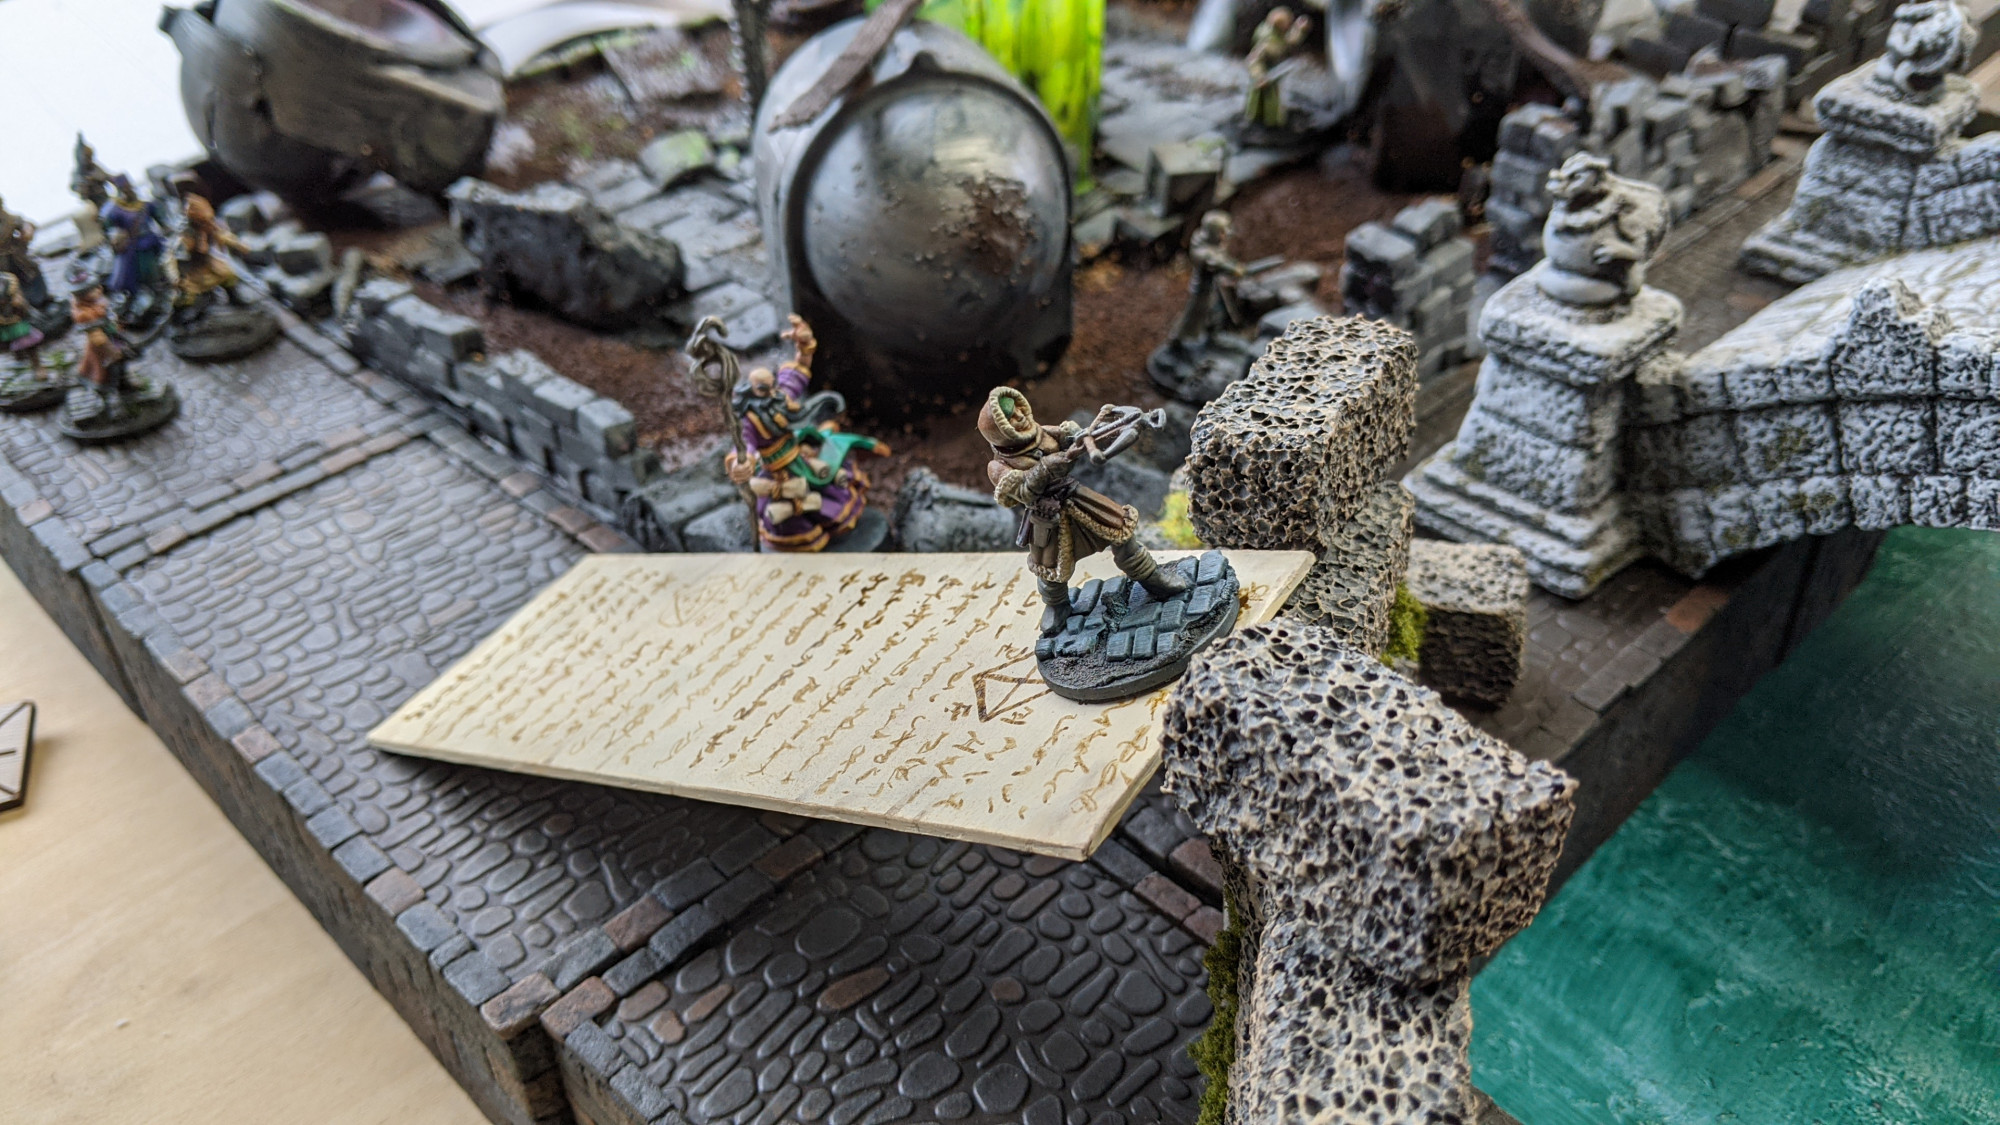
With that, the game got underway! John’s wizard, Elder Futhark, led his warband out of the ruins of a crumbling laboratory, casting Bridge to create a path up to a shattered cornice which allowed his archer to plink away at my advancing dwarf warband.
The bridge here is a massive ribbon of inscribed parchment paper, which is perfect for John’s Sigilist wizard. The stone bridge you can see on the right side of that photo became a hotly contested terrain piece, with John and I both carefully jockeying for position. At one point, he successfully blocked me out with a wall of fog, which prevented my crossbow dwarf from seeing anything on the opposite side of the table. After a few rounds of spells and combat, we agreed to a tenuous truce and redirected our forces to other hotspots on the battlefield.
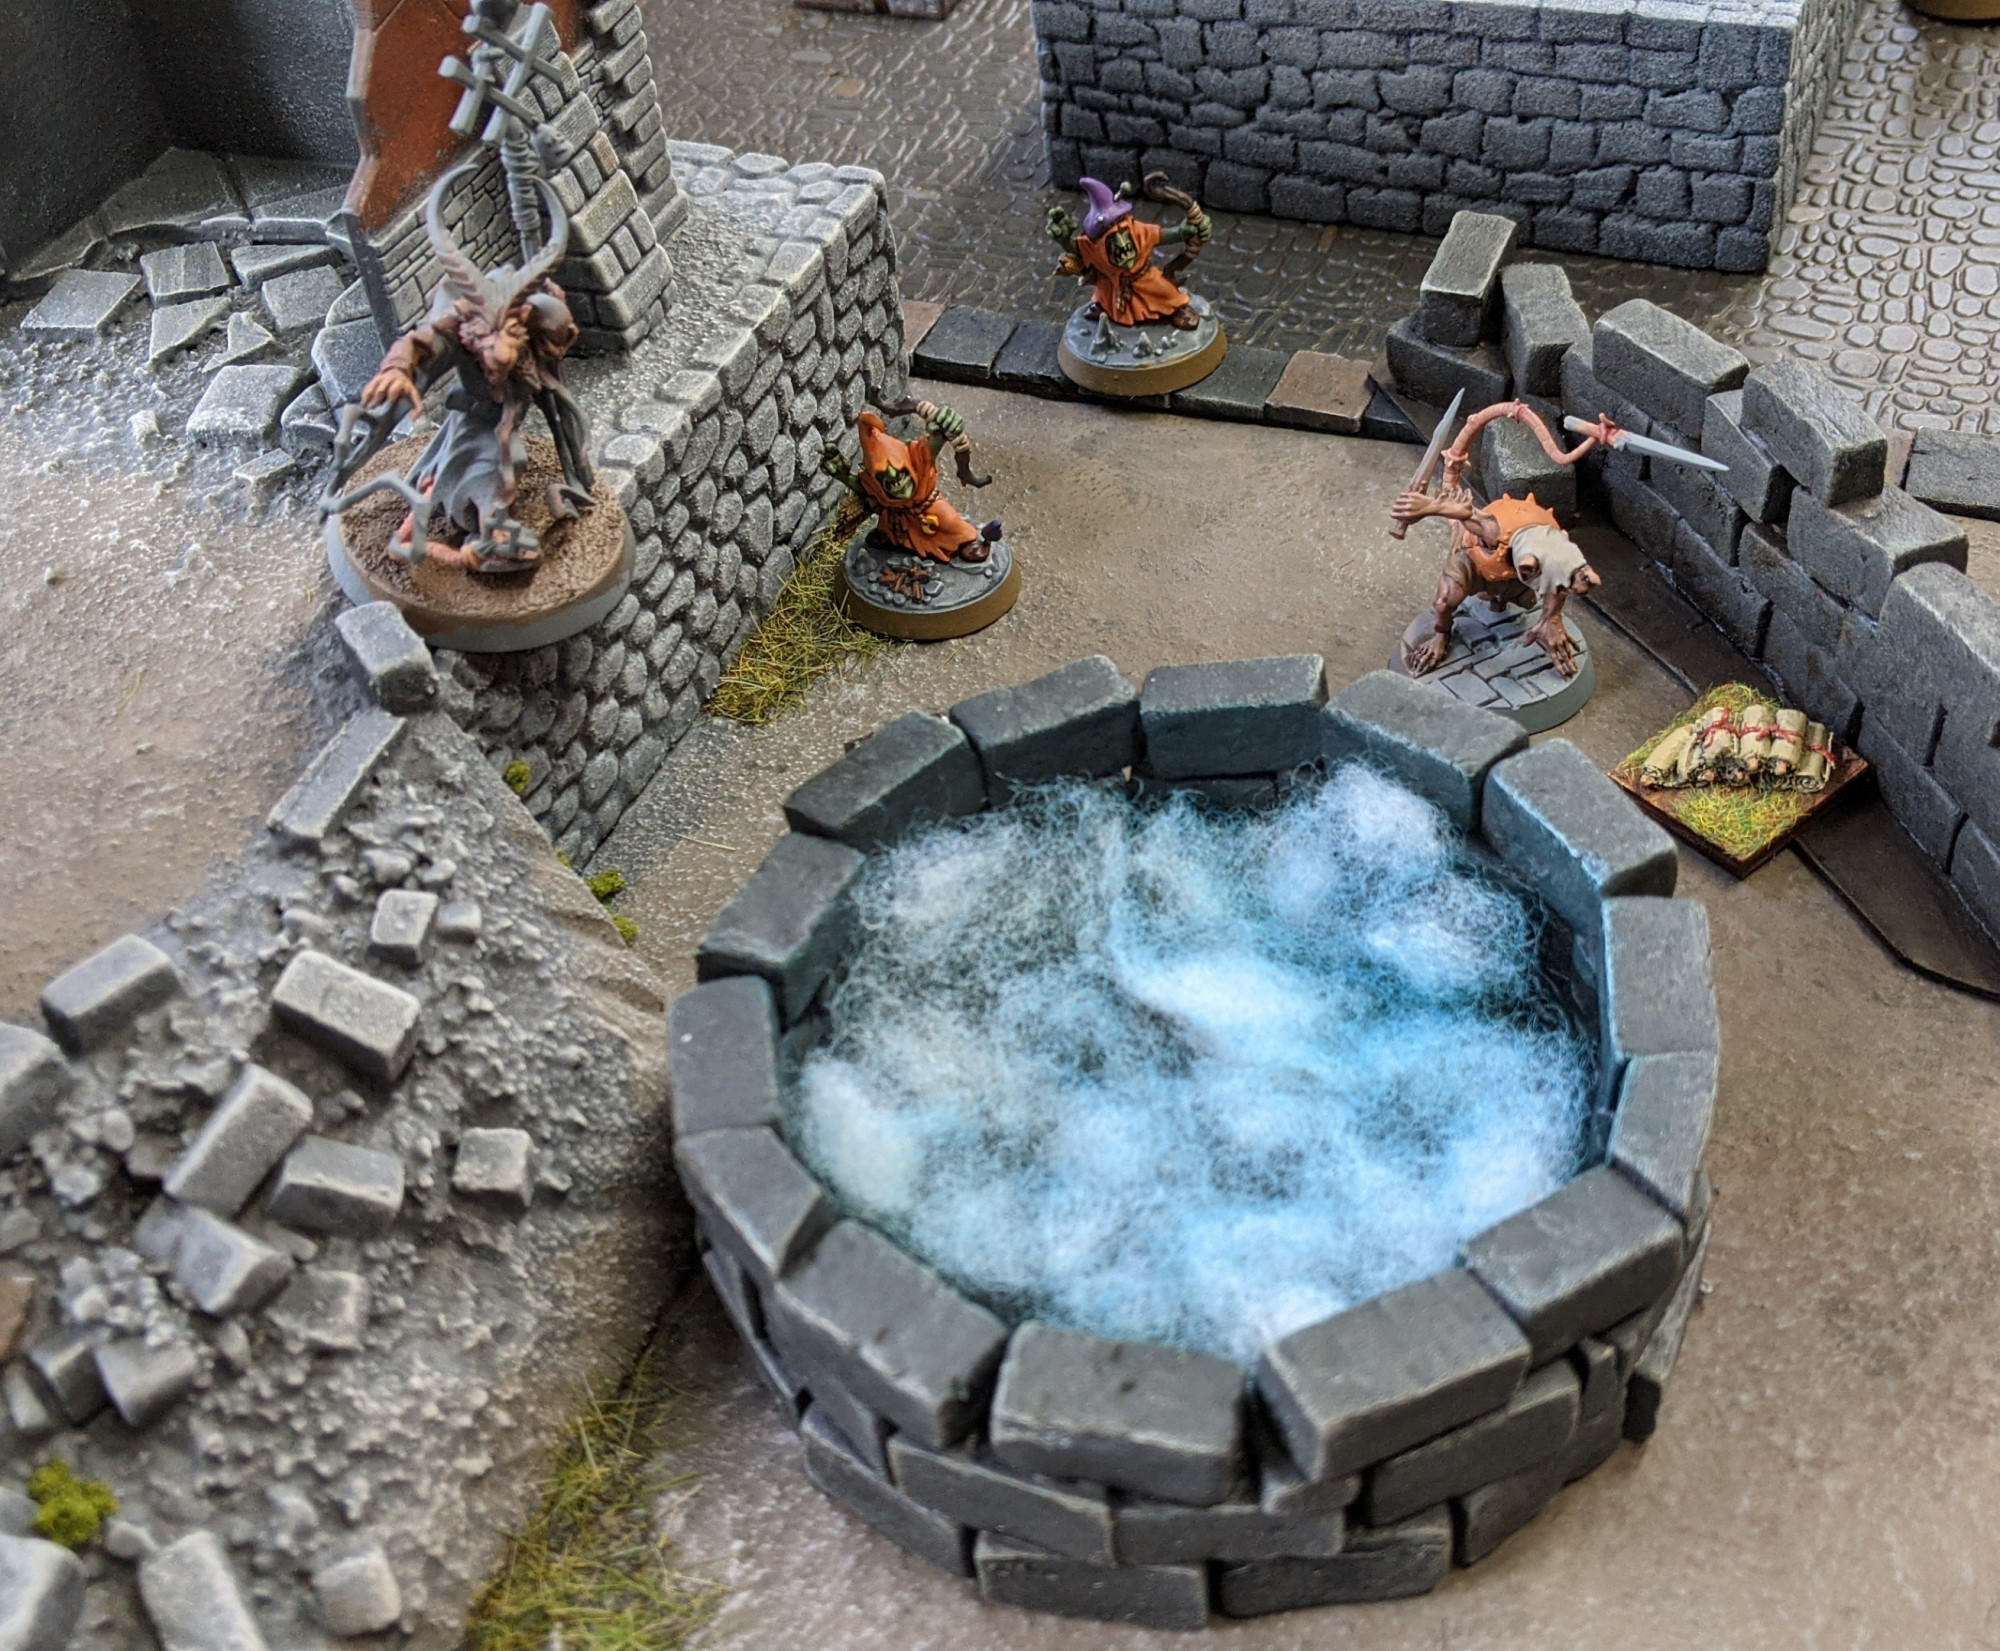
Elsewhere, Vincent and Lawrence found themselves competing for a handful of treasure pieces amid the ruins of a broken wall. The Skaven were particularly interested in this abandoned well, which seemed to seethe and bubble with barely contained arcane energy.
One of the most interesting elements of Frostgrave is the optional rule for wandering monsters. These are creepy denizens of the frozen city that, depending on the dice roll, show up when you least expect them to menace and stymie the plucky warbands.
Since our group has a sizable collection of varied and wonderful miniatures, there was no question that we would be using the wandering monster rules. We even had a 5th player, Mark, who volunteered to run the monsters as they began wandering onto the battlefield. The action started off with a wild-eyed boar that showed up to gore and thrash John’s warband!
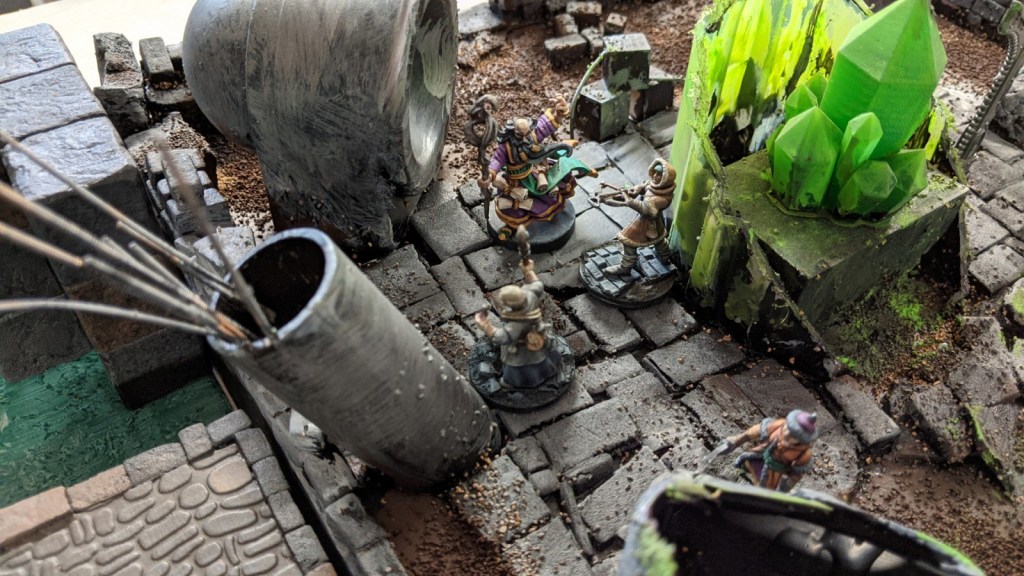
In another notable instance, a loathsome spider roped down on thick strands of webbing to attack the grim warriors from John’s and Lawrence’s warband … just as they were coming to blows over a treasure token! It’s the little encounters like this that makes Frostgrave such a joy to play.
As we entered our final turns, it became clear that the treasures in the center of the map, arrayed around the derelict docks and quays of the canal, would be a great prize for those bold enough to claim them. All of the warbands began edging closer to the docks, using spells and missile fire to cover their approach.
It was a bitter clash and I do not recall that anyone actually claimed the central treasure, represented here by a floating enigmatic crystal prism. But plenty of warbands made off with 1 or 2 treasures, and I believe Lawrence’s warband snagged 3 treasures! Wow!
After the game concluded, we walked through the post-game campaign steps. This is one of the most compelling aspects of Frostgrave, and it helps to set the game apart from other one-off skirmish games. We rolled on a series of random charts to determine the grisly fate of our wounded soldiers and to find out exactly what we had uncovered for each treasure token. It was a ton of fun and it’s already helping bring some character to our starting warbands!
Our next session is coming up this weekend, and we’re eyeing the Mausoleum scenario from the main rulebook. Stay tuned for more!
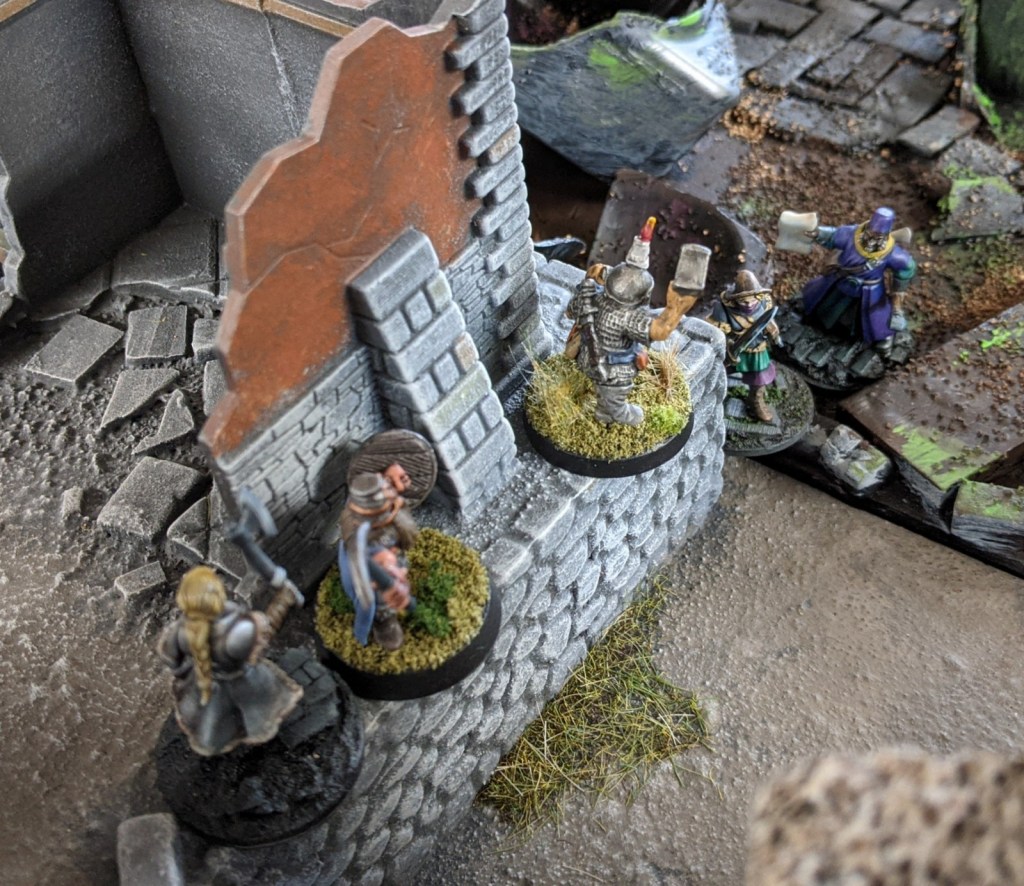
This is a short post, mostly just to highlight my entry into Azazel’s December Community Painting Challenge: the Sepulchral Guard, representing some of the best undead miniatures that Games Workshop has released in years.
The December challenge involved selecting and painting a unit or model that “sparked joy” and made you really hunger to pick up your paintbrush and layer on a few coats. For me, the choice was easy. Almost exactly a year ago, the wife got me the Sepulchral Guard warband for Shadespire.
I absolutely love the models and have been relishing the prospect of painting them up, but to my eternal shame, it took me nearly a year to get down to business. I mean, I can can count on one hand the number of times my significant other has given me miniatures as a gift. So I really had no excuse for these guys.
I love the figures. They’re classic skeletons, unadorned with anything that might situate them in a particular milieu or setting. And the poses are absolutely dynamic without being overwrought or too detailed. It’s a real shame there are only 7 individual sculpts in this set … I could easily see myself painting dozens of figures in this style.
I tried out a bevy of painting and weathering techniques on these guys. Small warbands are a great excuse to flex your painting muscles and experiment with new styles and techniques.
So there you have it! I just took the one group photo, but maybe I’ll go back and do some individual photos. For now, here’s my entry into the December Community Painting Challenge!
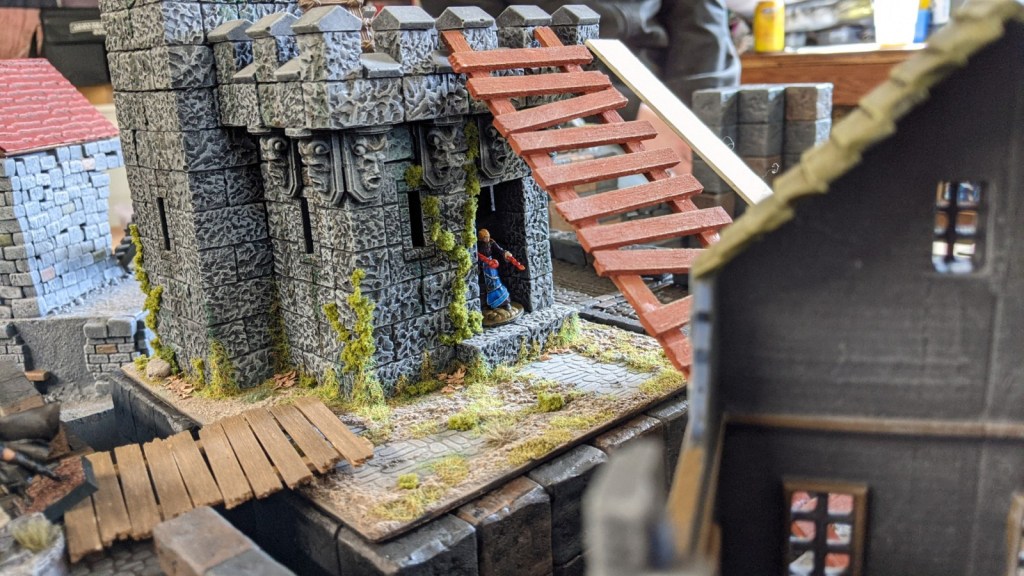
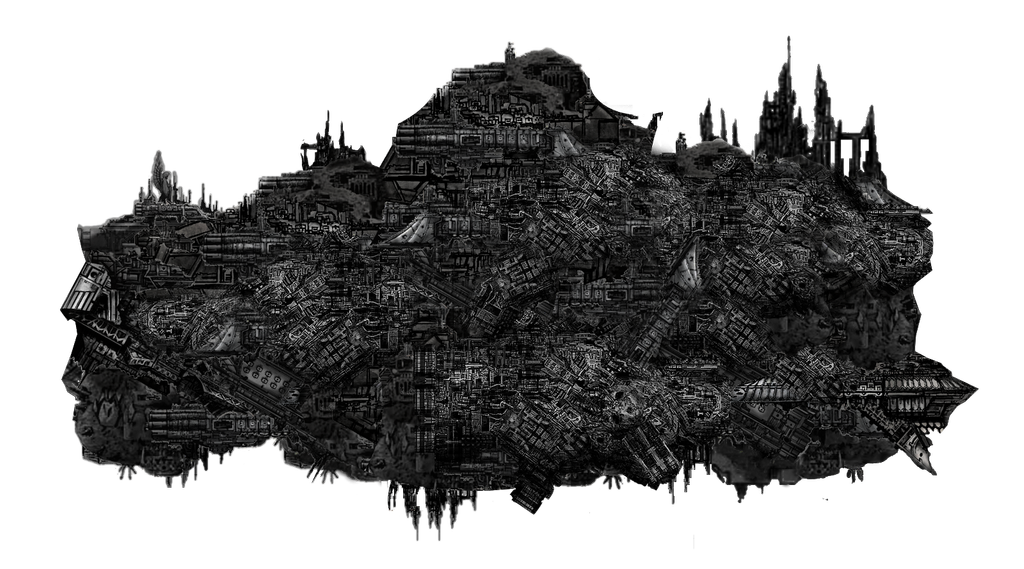
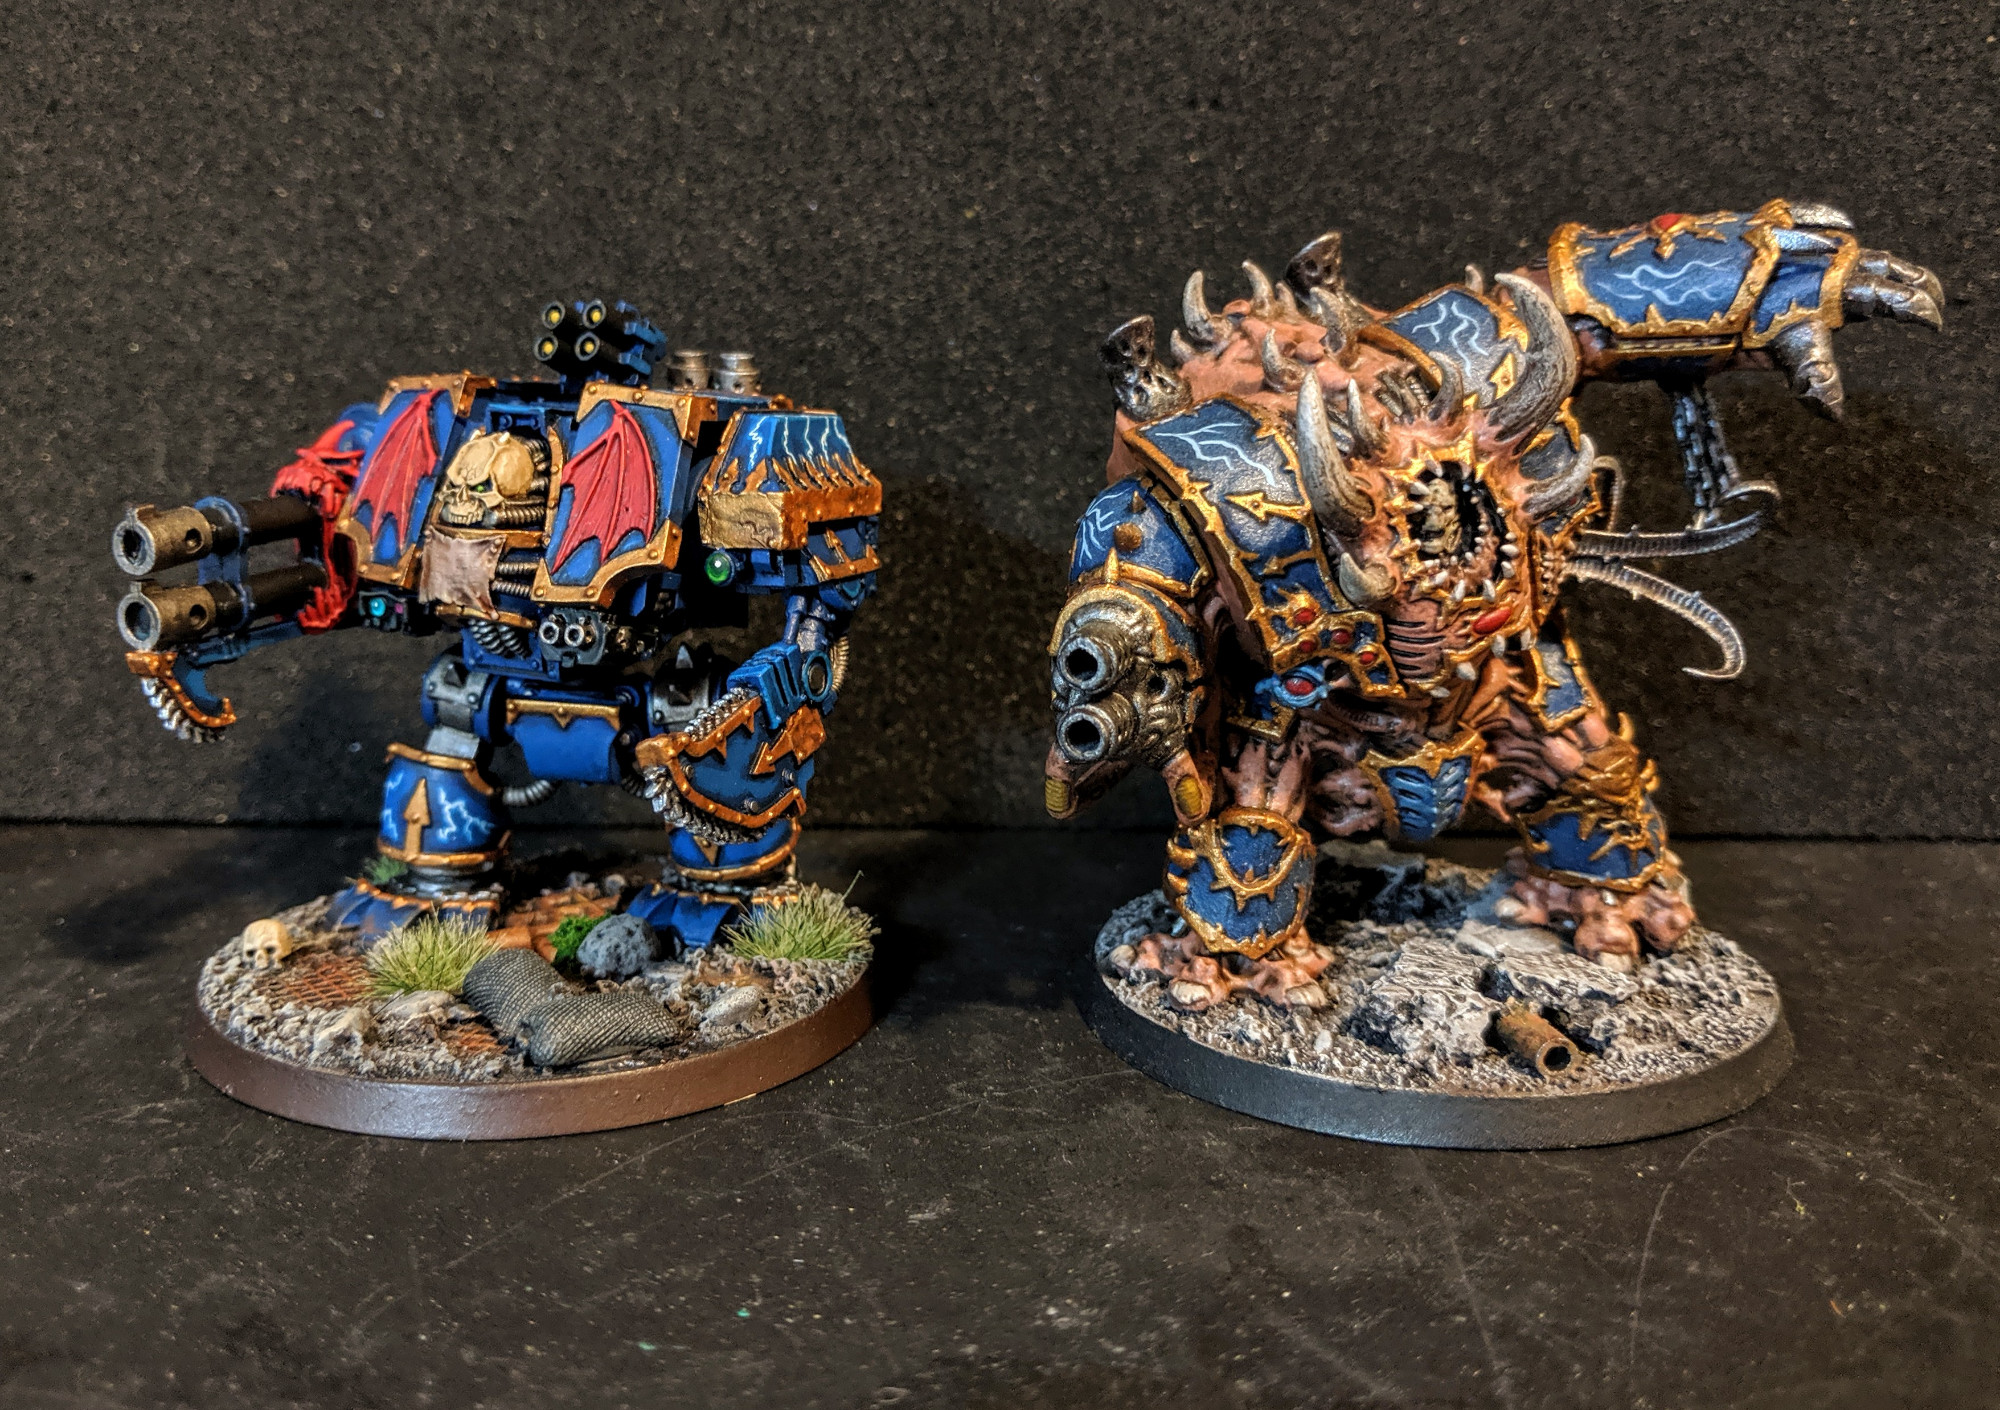
Footsteps echoed throughout the dim corridors of the cavernous vessel, the trudging sound of ceramite on steel. Calling the Crucible of Flesh a “vessel,” was a statement of fact, strictly speaking; the vast, miles-long behemoth was indeed a vessel. And in its warp-tainted heart, it carried the full measure of the most murderous band of Chaos Space Marines in the Caluphel Sector: the Oath of Midnight, fearsome bannermen to the Night Lords Legion.
What the Crucible of Flesh was not, however, was a spaceship. It had long since transcended beyond such a mundane term. Comprised of derelict cruisers, wrecked defense platforms, rogue asteroids, half-frozen corpses of void beasts, all held together with the disambiguated flotsam of centuries of warp travel, the vessel defied categorization. To the miserable defenders of the Imperium, the craft would be called a space hulk, and would be viewed with equal parts fear and awe.
To the Night Lords, who had roosted like bats in portions of the shadowy leviathan for the better part of three years, the Crucible of Flesh was more akin to a lair. From its benighted depths, the Oath of Midnight’s scrappy fleet of strike cruisers went forth like vultures, plundering the war-torn Caluphel Sector even as the massive space hulk drifted ever closer to its destination.
Aboard the vessel, the individual squads of Night Lords burrowed deep into the darkest corners of the rotten hulk. Deranged chanting and blood ceremonies marked the passage of the days and months as Astartes warriors gave themselves over to unnatural worship and unspeakable rituals. Raptors hunted in packs in the vast zero-g sections of the hulk.
In the aft section of the gargantuan vessel, inside the crumbling ruin of a deep space smelter, and rumors persisted of hulking monsters of metal and flesh being assembled there, piece by piece in the molten forges. In the sprawling launch bay of what had once been an Imperial cruiser, row upon row of tanks and armor stood silently, waiting deployment by the Oath of Midnight.
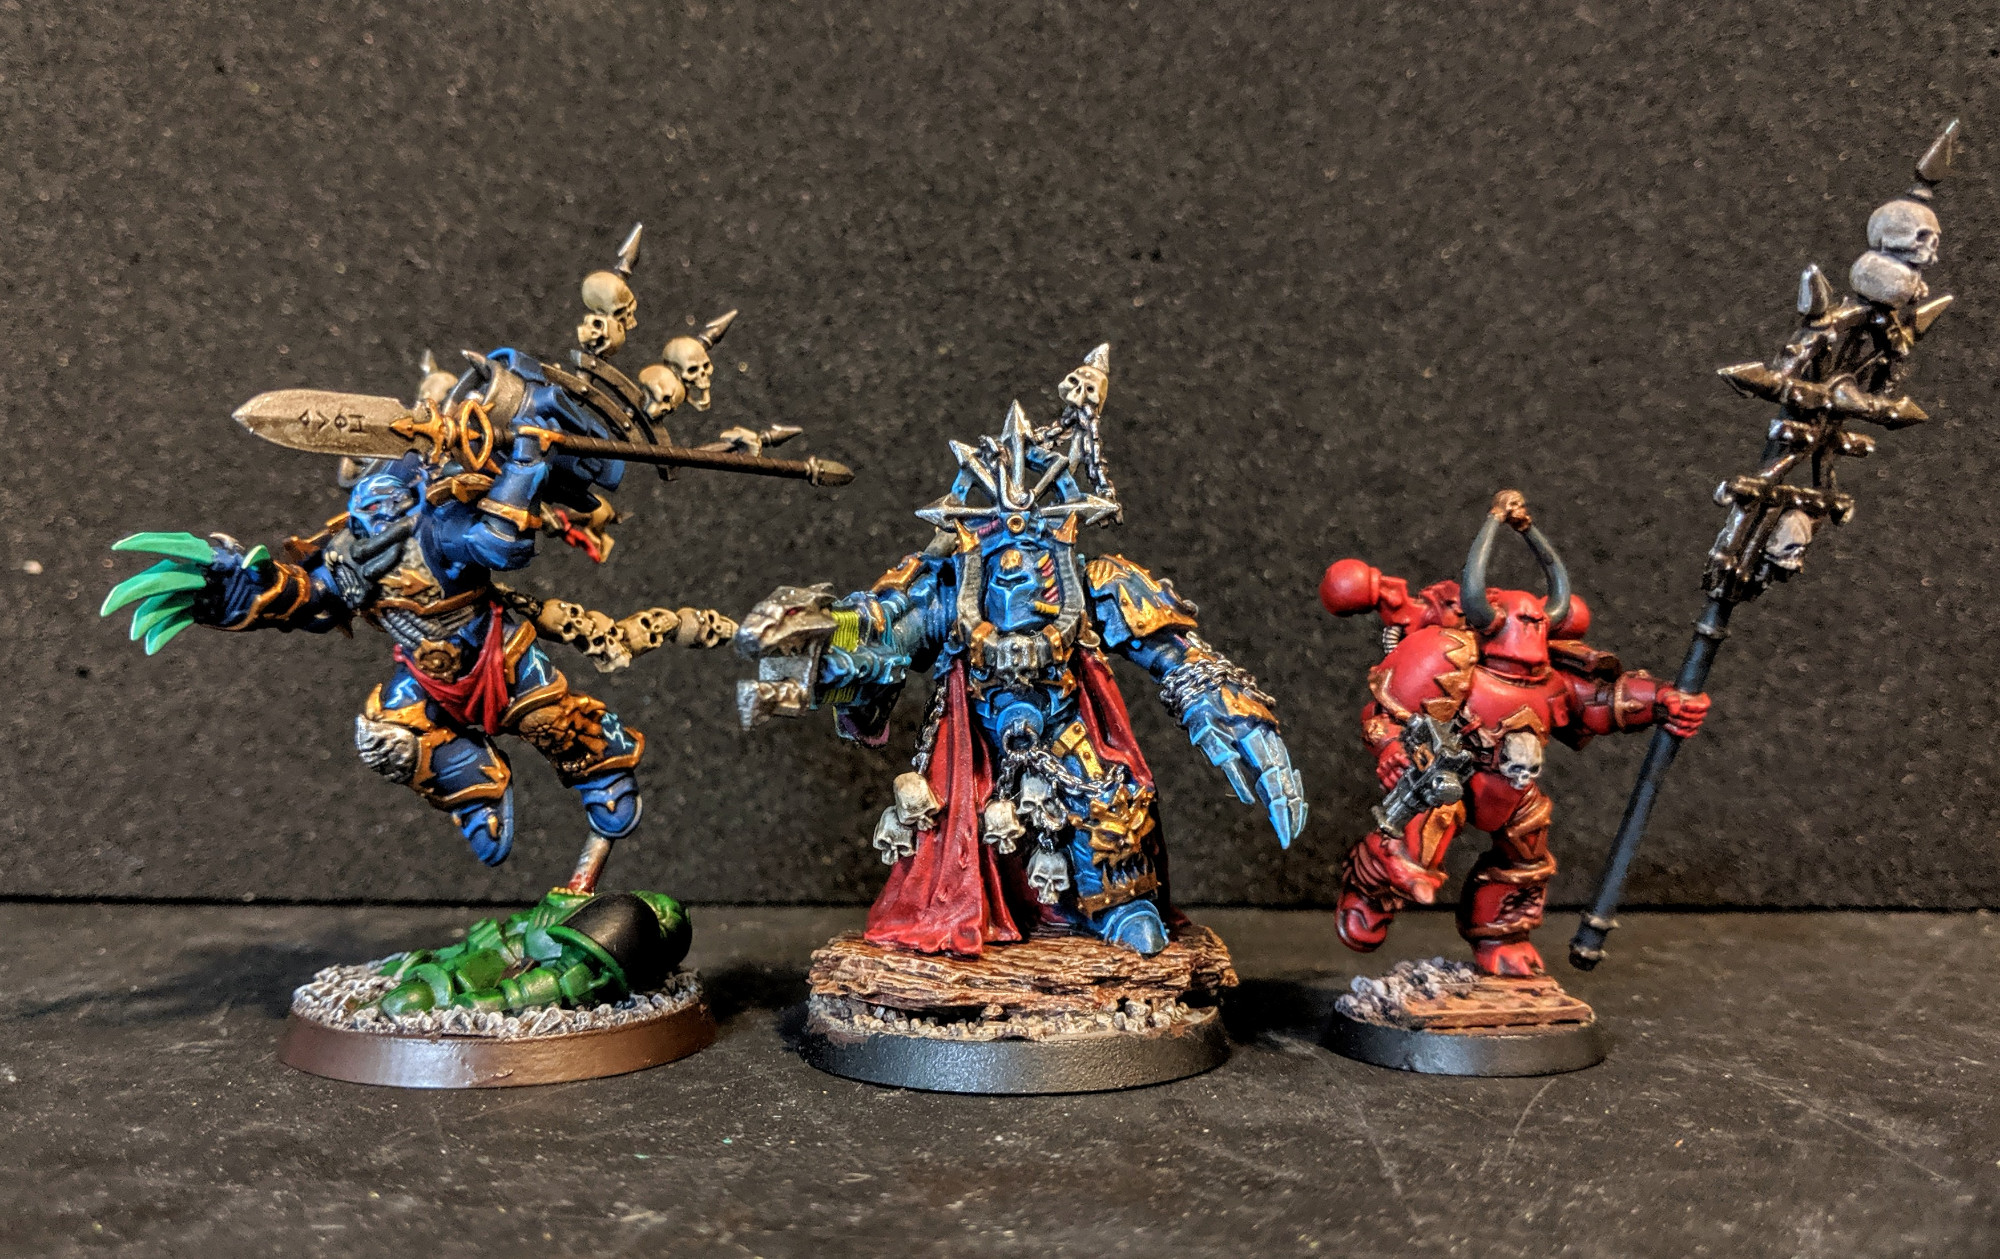
In the halls of the Crucible of Flesh, Lord Molitor Ashmouth strode with a newfound sense of purpose. There was a quickening in the air. The destiny of the warband, which he had led for nearly a millennium, was beginning to curve toward — what? Apotheosis? Or vindication? Molitor closed his eyes, seeking the portent that had plagued his mind these last few months.
There. On the periphery of his vision, dancing just beyond his comprehension: a grinning skull, half black and half white. A clawed hand, outstretched and beckoning. And a voice, hissing and sinister, uttering a single word: “Halla…”
Molitor’s vision abruptly cleared, and he glanced around at the Astartes entourage that was accompanying on this survey through the bowels of the space hulk. They looked expectantly at him. One spoke: “What vexes you, my lord?”
”The hour draws near,” Molitor said slowly, his voice distant and distorted through the vox amplifiers built into his armored helmet. “Our oaths will be fulfilled. The path has been made known to me. Assemble the legion — we make for the Halla Abandonment!”
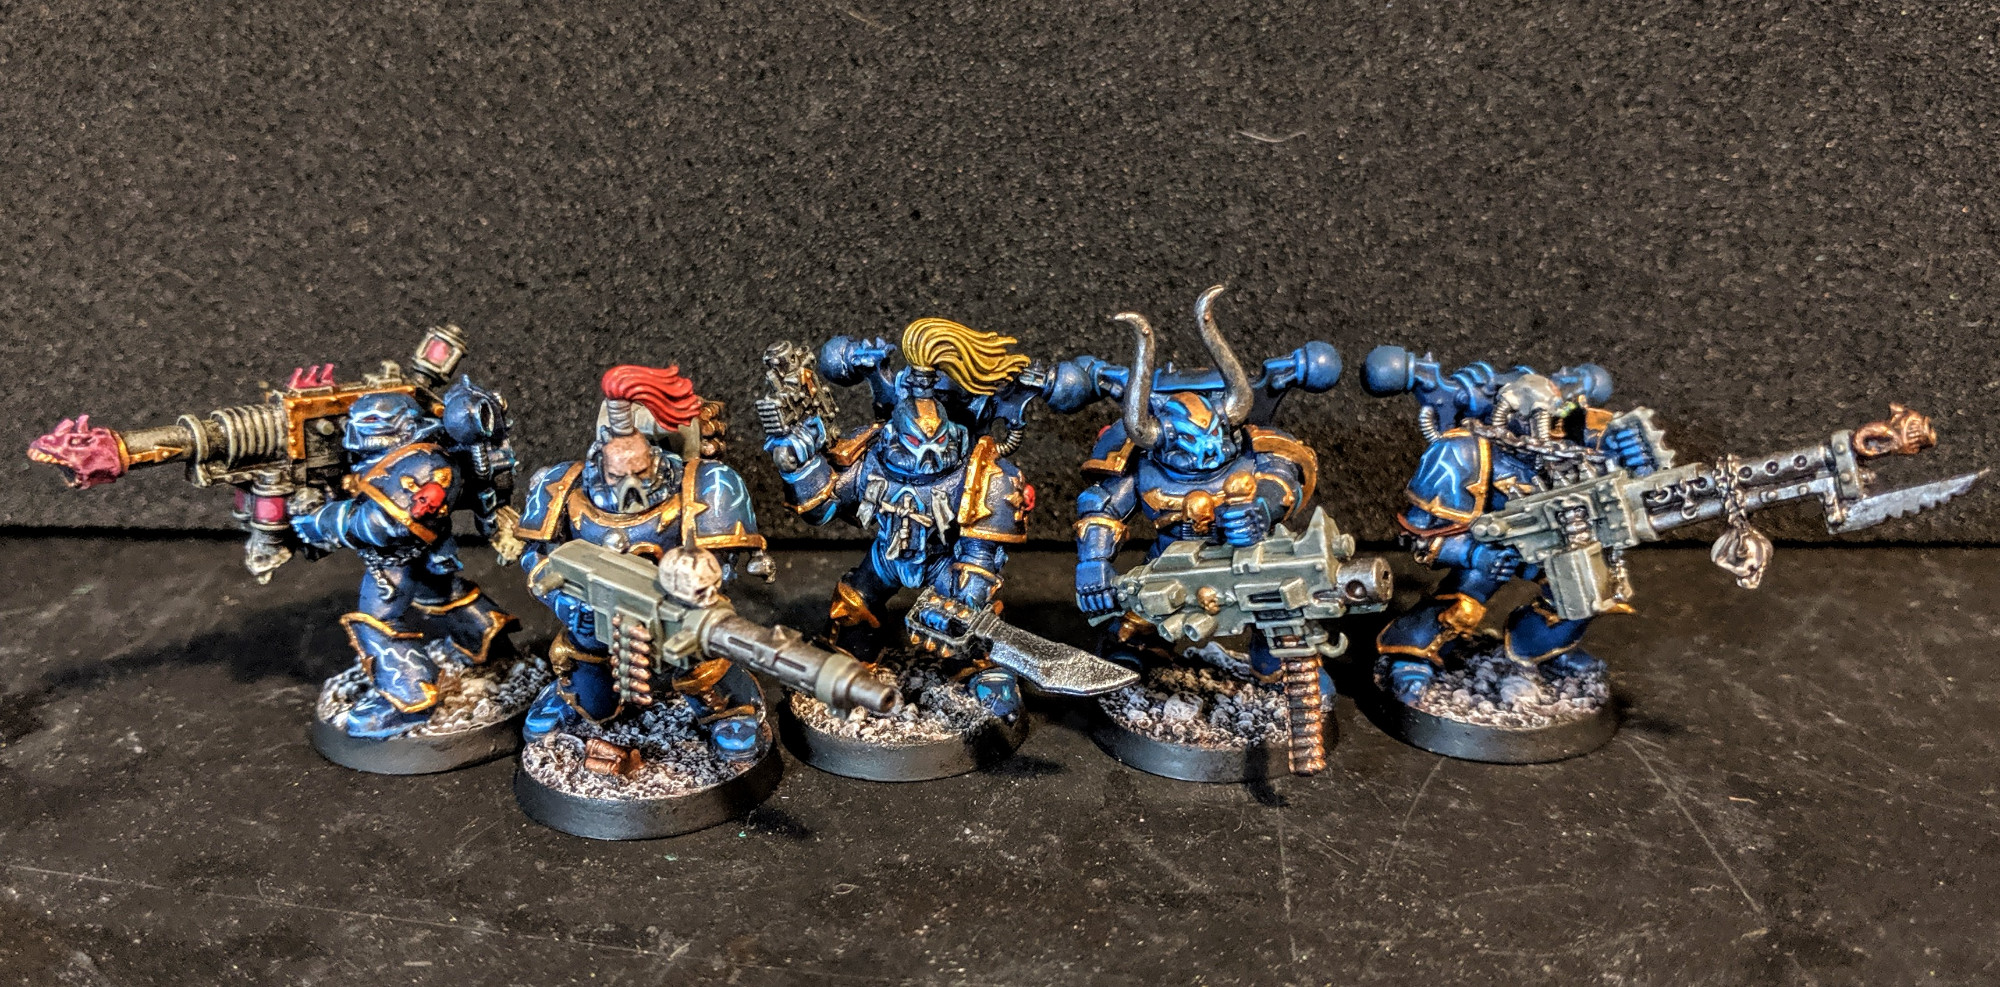
The Oath of Midnight
Ah, nothing like a bit of lore to kick-start the next chapter in our Caluphel Sector campaign. Last year I focused on my nascent Death Guard army, adding quite a few units and building up a huge force by the time our Apocalypse game came along in December.
This year I’m using the campaign as an excuse to build upon my beloved Night Lords warband, the Oath of Midnight. I’ll be painting up new units and vehicles, with special attention paid to a lot of the unique looking character models I’ve accumulated over the years. First up (scheduled for next week) is a post about my first five Heretic Astartes from the new Shadowspear box.
Squad Goals
As the campaign opens, the Night Lords are aboard the space hulk Crucible of Flesh, which was first spotted last summer coasting through the outskirts of the Glouroth Sub-Sector.
Now the space hulk has drifted into the Ianthe Sub-Sector, which was detailed last summer by Paul. The idea is that the Night Lords are just passengers, and the space hulk itself is being drawn to something in the Ianthe Sub-Sector. As you might surmise from the intro lore, that “something” is a mysterious region of space within the Ianthe Sub-Sector known as the Halla Abandonment.
Our campaign GM has invited each player to submit a narrative goal of some sort to work toward over the course of the campaign. I decided to make the exploration of the Halla Abandonment the goal for my Night Lords. I have an idea of what they may find there, but it remains to be seen just how successful they are in plumbing the depths of the Abandonment. Stay tuned for more!