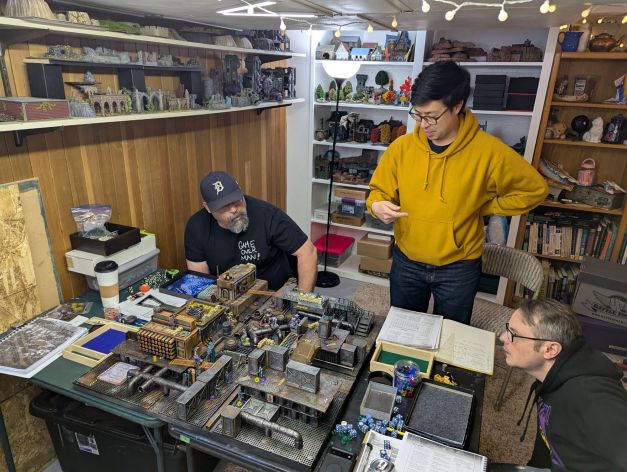
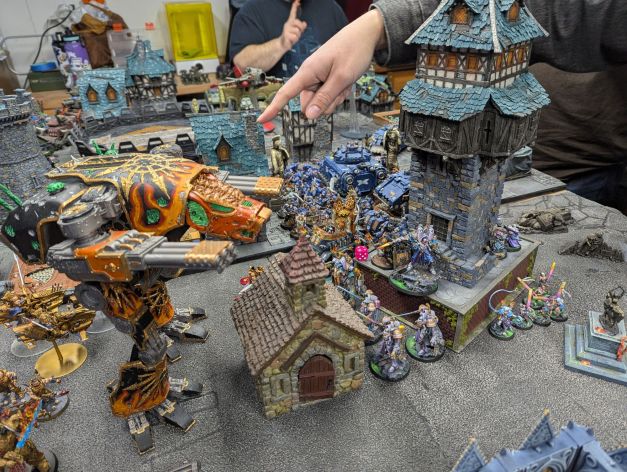
The gang got together last month for another game of Shadow War: Armageddon in my basement game room. I was excited to try out my new grimdark battle board, which I had whipped together in a creative frenzy a few weeks back. The board was a bit small for a typical game of Shadow War: Armageddon, but I was confident I could solve that with a few slight modifications to initial deployment — and plenty of terrain, of course!
We were putting Shadow War: Armageddon through its paces with an eye toward embarking on a small mini-campaign using this ruleset. With that in mind, we dredged up a multiplayer scenario that was published specifically for Shadow War: Armageddon. It’s long gone from the official Games Workshop site, but you can snag the PDF at the link below.
The scenario attempts to add some balance to a game mode (multiplayer) that is innately imbalanced. We had four players, which was the ideal number for this published scenario. Let’s see how the game shook out.
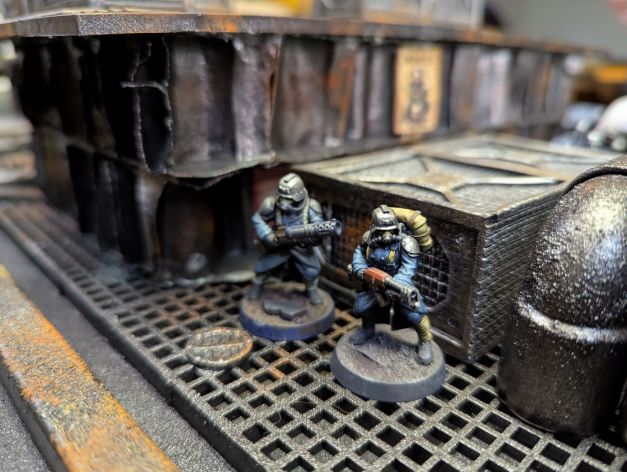
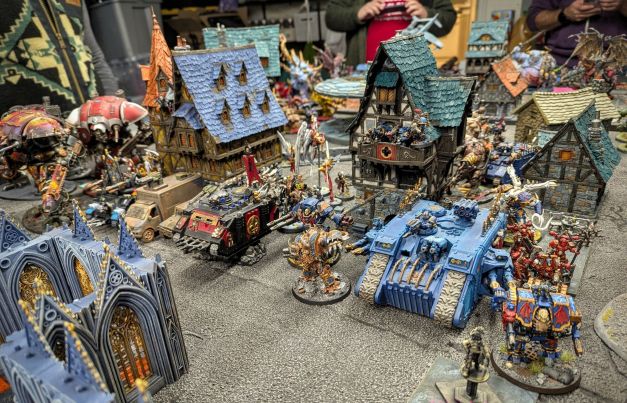
Each player chose a corner and deployed their warband. I was running my Dark Mechanicus (kitted out using the Adeptus Mechanicus warband), Rian was running his gorgeous Sisters of Battle, Jim was fielding his Orks, and John brought his eponymous Imperial Guard. Here’s a peek at the warbands in their initial deployment areas.
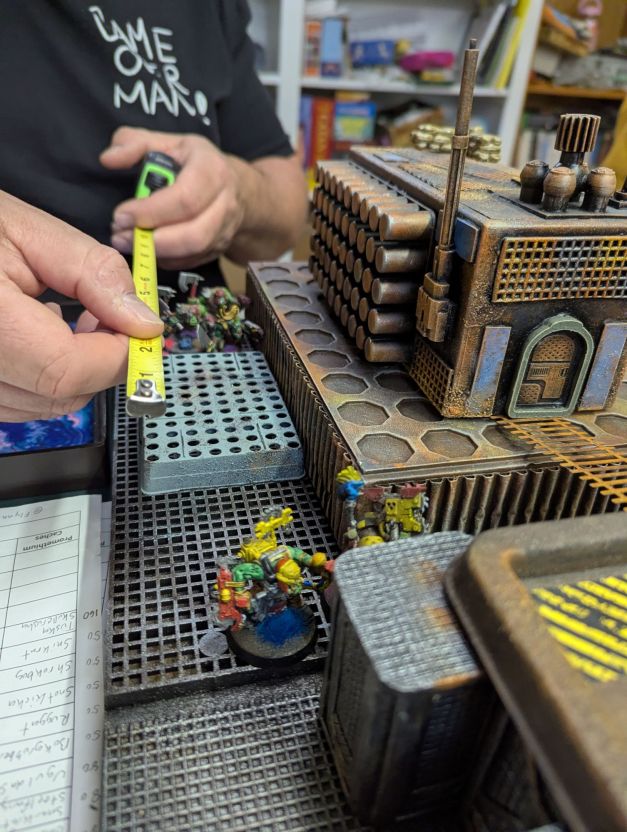
The battlefield was absolutely choked with terrain: platforms, pipes, walls, barricades, and all sorts of debris. Nobody had a good shot on the first turn, so we spent our time advancing cautiously.
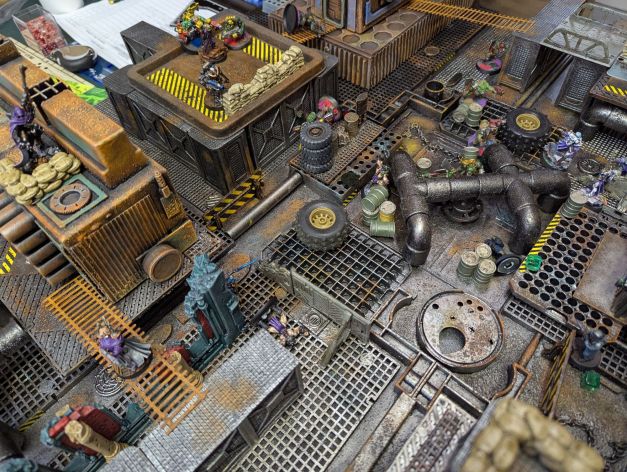
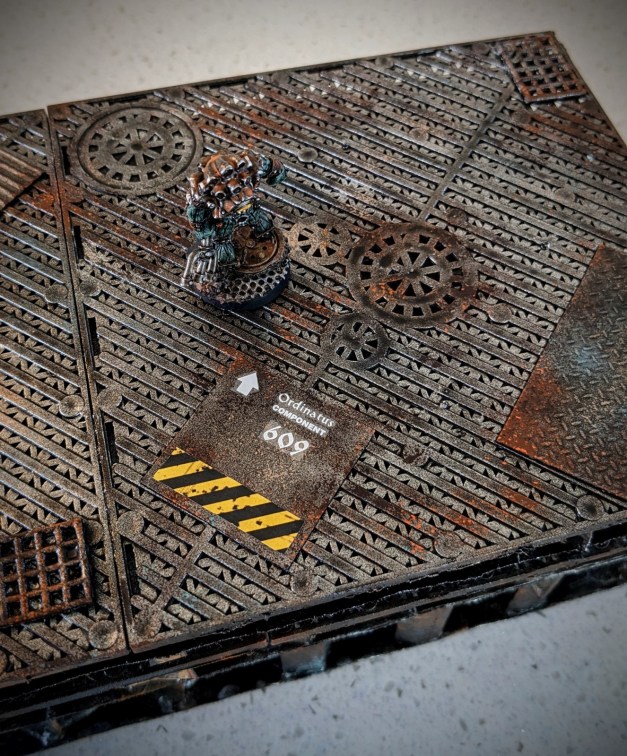
The objective was a promethium valve in the center of the battlefield, surrounded by empty fuel canisters. If the warbands could reach the valve, they could fill a tank and carry off some valuable promethium. We were destined for a mighty clash in the center of the battlefield!
You can see the valve underneath the pipe interchange in the photo above.
It was a wild game. John, to our amazement, employed actual infantry techniques (bounding advance with troopers moving up into overwatch to cover their buddies) and found them to be very effective.
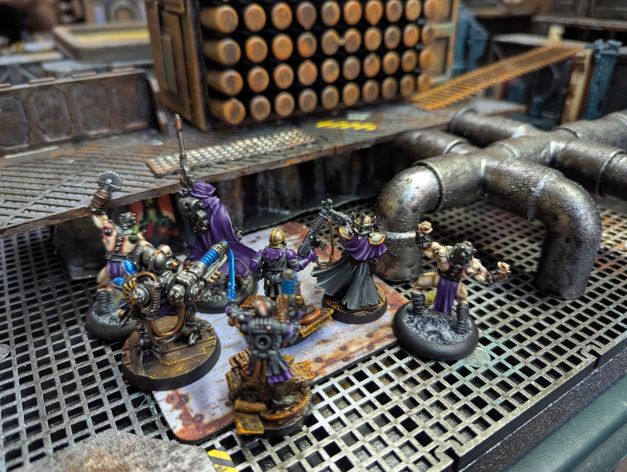
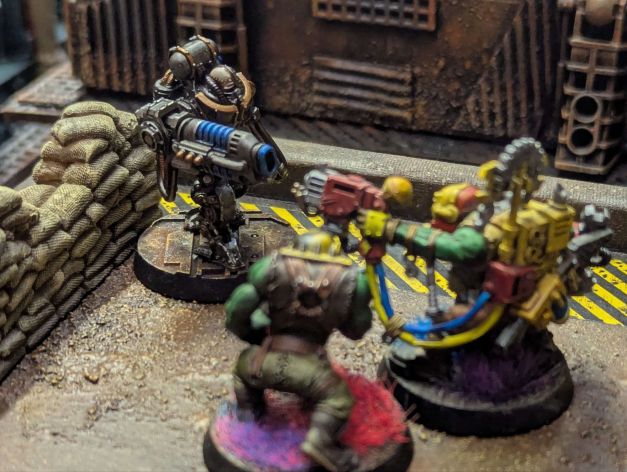
Jim’s Orks had no need for such subtleties — they mostly charged forward, blasting with pistols before charging into close combat with various choppy implements. The victim in the photo below is Ajax 07/4 Ascendant, one of my Dark Mechanicus warriors.
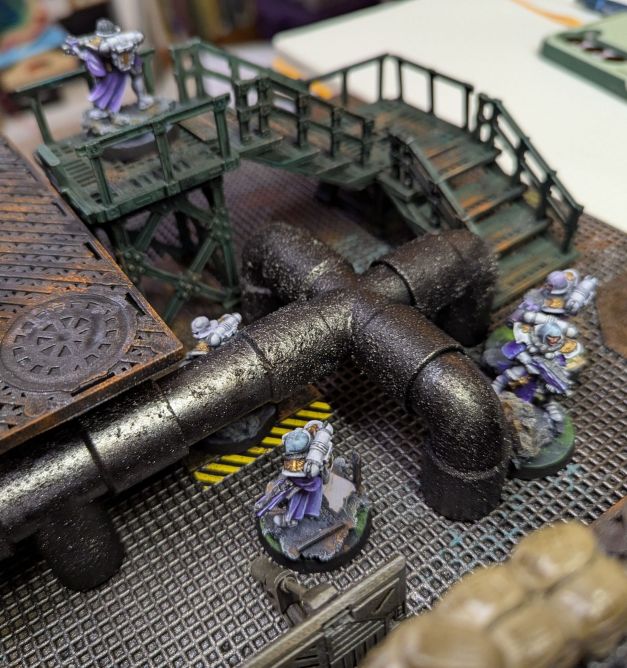
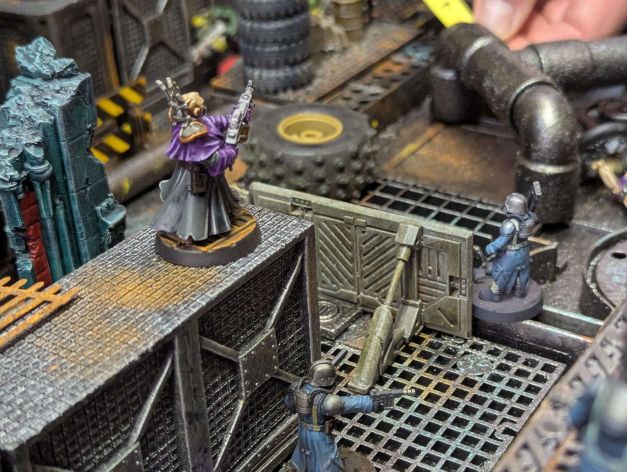
While Jim and I were frantically smashing our forces into each other, Rian was prudently advancing with his Adeptus Sororitas, taking a few potshots (and receiving a few in return). His miniatures looked epic as they navigated the tangle of walkways and pipes in the underhive.
Eventually (and predictably, given our 4-player scenario focusing on a central objective) we all ended up in a giant scrum in the center of the battlefield. Jim’s Orks burst out of cover just as Rian’s Sisters of Battle arrived on the scene, with John sniping from the perimeter and my Dark Mechanicus licking their wounds in the shadows. Another glorious clash in the underhive!
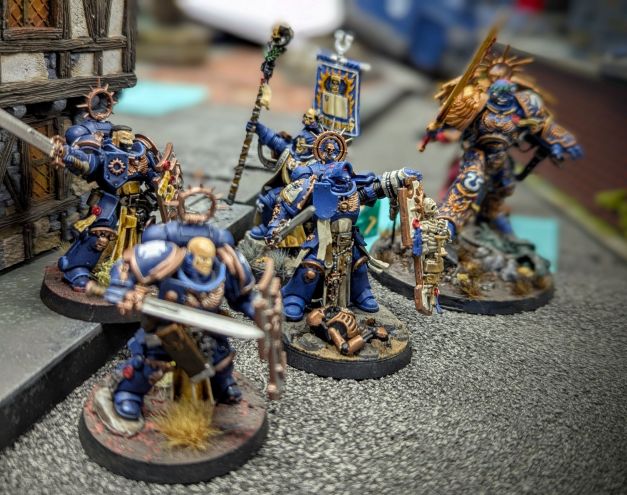
In the end, patience paid off for Rian, as he was able to haul off a couple barrels of promethium while the rest of us were preoccupied with slaying each other. Here’s his Cannoness hoisting her chainsword in triumph!
Once again, Shadow War: Armageddon gave us a great game! It was fun and easy for a new player to learn. It’s very much a GW type of game, so it has zaniness like grenade deviation and poorly balanced wargear options for the various gang lists. But it’s super streamlined and efficient … just one book is all you need. And that’s an approach that really resonates with us here at Comrade’s Wargames.
In any case, we’re interested in using Shadow War: Armageddon for an Inq28 campaign later this summer, so stay tuned for more!
I’ve long been interested in getting some ideas down about my Dark Mechanicum warband: motivations, the names of various leaders and other personalities, and some general warband lore.
The Dark Mechanicum is one of just a small handful of factions in the Warhammer 40,000 that hasn’t been explored in exhaustive details, and that pleases me immensely. It means there are still some darkened corners to explore, some dim hallways that haven’t been illuminated with a wiki article. Light a torch, gentle reader, and let us plumb the unknowable depths together.
Curse This Metal Body
The Dark Mechanicum encompasses a myriad of factions who seek forbidden knowledge that exists beyond the flickering light of the Imperium of Man. While some may seek this knowledge from a position of misplaced altruism, we concern ourselves here with the truly corrupt few who understand that knowledge can be weaponized and used to wield immense power.
With most of their humanity wiped away after centuries of replacement and repair, the vile hereteks of the Dark Mechanicum seek to harness the darkest secrets that remain in a galaxy gone mad with ignorance. Operating from derelict space stations and abandoned asteroid hideouts, the Dark Mechanicum are composed of both brutal raiders and brilliant engineers, working side by side to accomplish their infernal goals.
The Seekers of the Fractal Schematic
The Seekers of the Fractal Schematic are one such warband. Emerging from the chaos that engulfed Gamma Euphorion Prime following a genestealer uprising, the Seekers have been seen operating throughout the Caluphel Sector on a variety of mysterious tasks. Garbled remnants of scrapcode broadcast on forgotten frequencies during their raids, together with the insane babbling of traumatized survivors, point to a singular focus on the fabled Fractal Schematic — a cryptic lodestone rumored to contain untold petabytes of infernal data within its gently pulsating crystalline lattice.
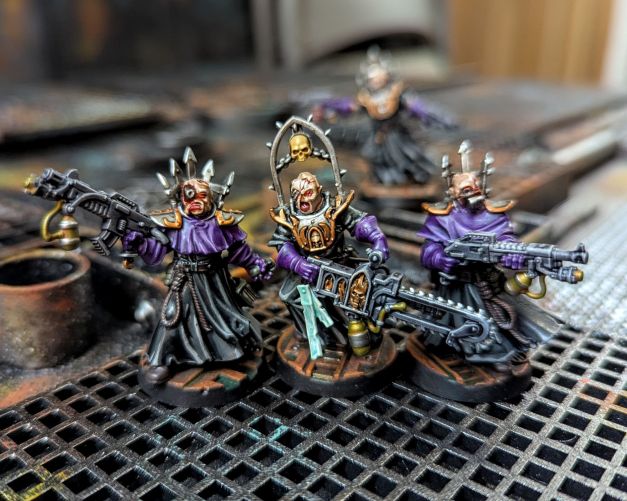
My Dark Mechanicum warband is a collection of miniatures from various manufacturers and sources. I don’t really like limiting myself to “official” figures or sticking with any one particular product line. So you’ll see figures in here from a variety of big name game systems, plus lots and lots of conversions, 3D prints, and smaller boutique sculptors. All it takes is a coherent paintjob to tie everything together and sell the warband concept.
If you’re curious about the origin of any particular mini, just leave a comment and I’ll do my best to enlighten you.
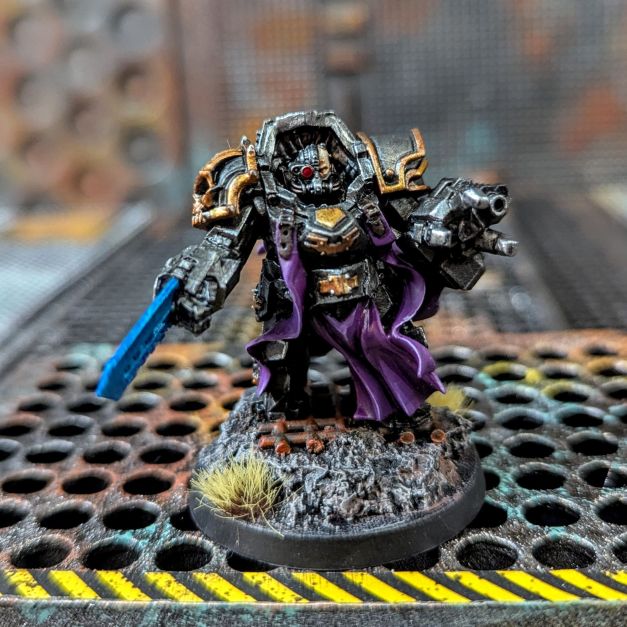
Draxus, the Blighted Cog
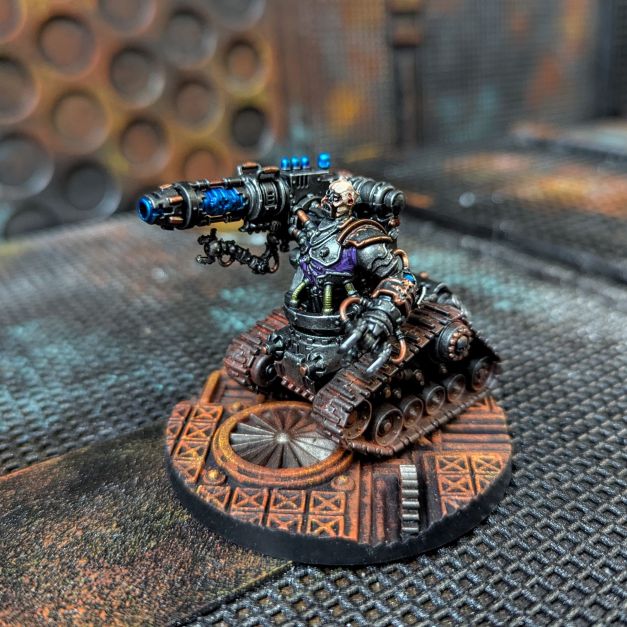
Draxus the Blighted Cog is among the most fearsome enforcers of the Seekers’ ranks. A hulking brute with a body assembled from cold steel, Draxus leads raids from his voidship Frigid Alloy. Although Draxus is admittedly a bit one-dimensional, he is but a servant of the warband’s true leader: the dread heretek named Rho-Terak, the Enslaver of Logic.
Rho-Terak has been a character in my warband’s lore for a long time, since the very beginning. Early on I used an Asphyxious miniature from Warmachine to represent Rho-Terak, but now I’m on the hunt for a suitably appropriate bespoke figure. More on that in the future!
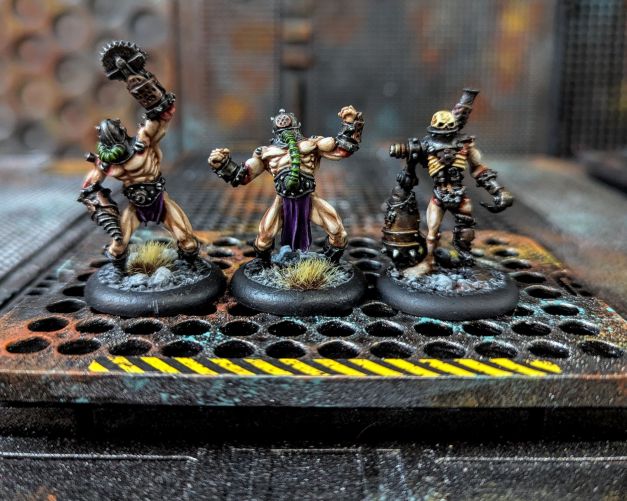
Mechanicum Drudges, from the Seekers of the Fractal SchematicMechanicum Drudges, from the Seekers of the Fractal Schematic
Drudges form the core of most Dark Mechanicum raiding parties. With ill-fitting cybernetics and a variety of ramshackle weaponry, these zealots can often be found scavenging useful scraps from among the fallen, always looking for a tempting tidbit that could be used to improve their own wetware.
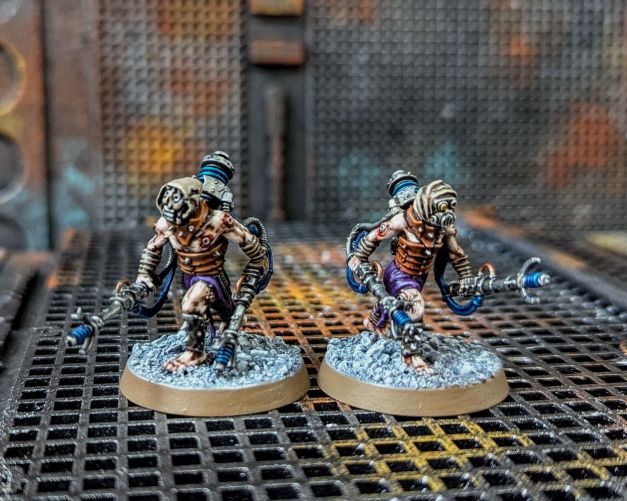
From left: Remnant of Deltilion, Remnant of Hypara, and Remnant of AbasmexFrom left: Remnant of Nihil and Remnant of Nocturnus
Remnants represent the lowest tier of the warband’s heirarchy and are often little more than a collection of emaciated limbs clutching rusted weaponry, animated by a crude battery pack. The tragic ranks of the Remnants are constantly replenished from among fighters who have displeased the Dark Mechanicum’s infernal leaders. Remnants have no free will of their own and rely on direct commands from nearby Surge Nodes, who drive them forward with sparking shock prods.
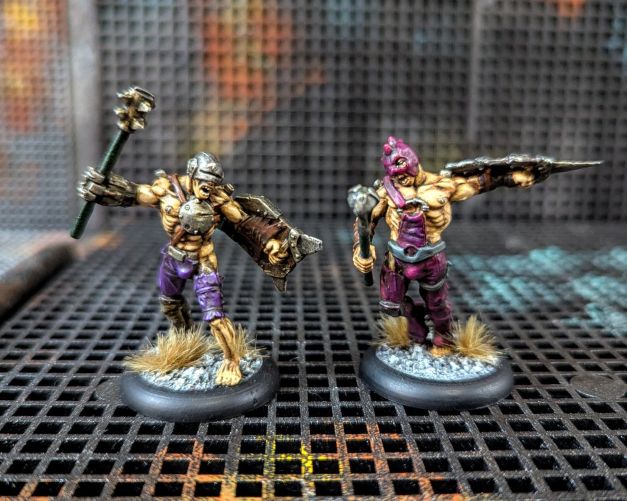
Surge Nodes
Surge Nodes are Dark Mechanicum warriors whose bodies have been threaded with so much wiring and augmentation that they fairly crackle with energy. In constant agony from their implants, these gaunt fighters lurch forward from ambush positions, tormenting their victims with gruesome shock prods.
Reclaimers
Reclaimers operate as the second echelon on the battlefield, following behind raiders to mop up survivors. They use unholy fire to burn away flesh and clothing, revealing blackened metal parts to be scavenged by marauding drudges. This loot is catalogued and hauled back to the Seekers’ lair for implantation.
Ascendant
Ajax 07/4 Ascendant is an example of a Dark Mechanicum warrior who is reaching the pinnacle of his inhuman metamorphosis. Ascendants are tech adepts who have been mutilated almost beyond recognition and equipped with cybernetic implants and weaponry to help them serve the warband. Lesser fighters hope to one day receive the gifts of the Ascendants if their service is rewarded.
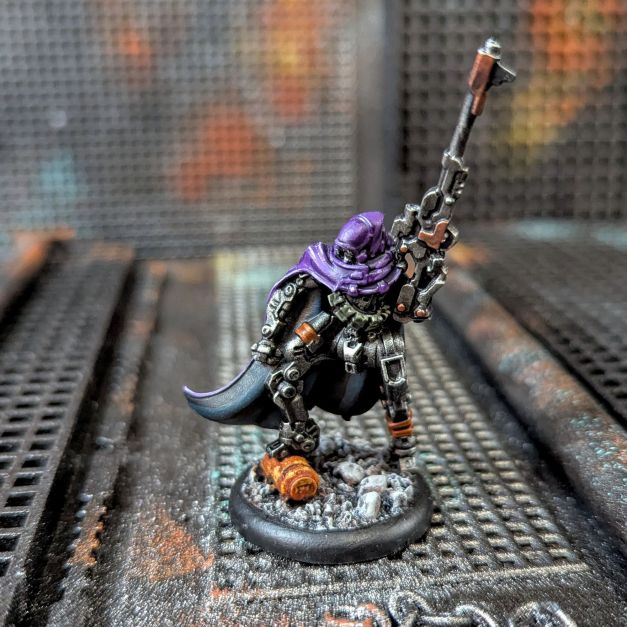
Exitor 5.41
Exitor 5.41 is an enigma among the Seekers — is he a true synthetic warrior, or does his gaunt metal frame still contain some shreds of flesh, entombed within a steel exoskeleton? As a marksman on the battlefield, Exitor 5.41 once held position for 71 hours straight amid driving acid rain, patiently tracking an enemy officer with his augmented eyesight and waiting for the victim to step out from a bunker and present a satisfactory target.
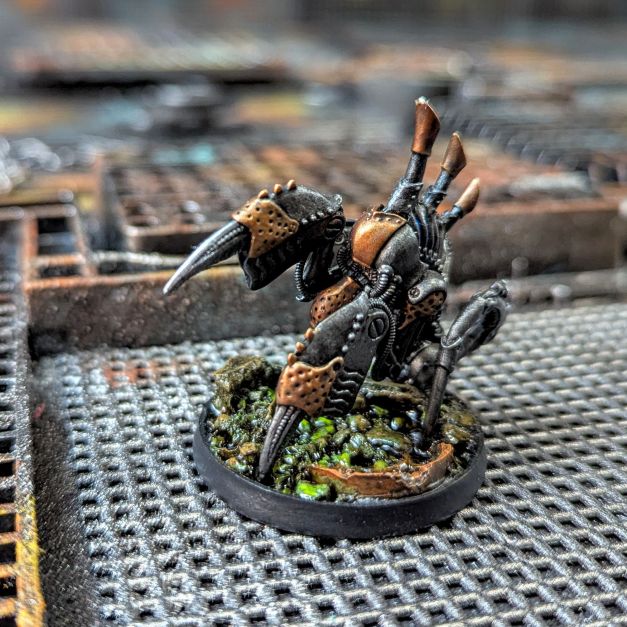
The Septic Hound
The Septic Hound is likely a heavily modified automaton, perhaps one of the fabled Men of Iron. The Hound was encountered centuries ago in a long-forgotten hive sump, half buried in a fetid stew of engine oil and mouldering fungus. At the time off its discovery, the Hound was inert, its power core dark. A series of repairs and modifications ultimately created the skulking, scuttling monstrosity that now serves the Seekers of the Fractal Schematic.
Thoth-Mu-XIV
Thoth-Mu-XIV is a tech adept whose cybernetic enhancements include razor sharp close combat fittings. While squads of drudges advance and scatter their foes, fast-moving stalkers like Thoth-Mu-XIV separate out fleeing soldiers to be captured, providing the Seekers with needed biomass for their flesh factories.
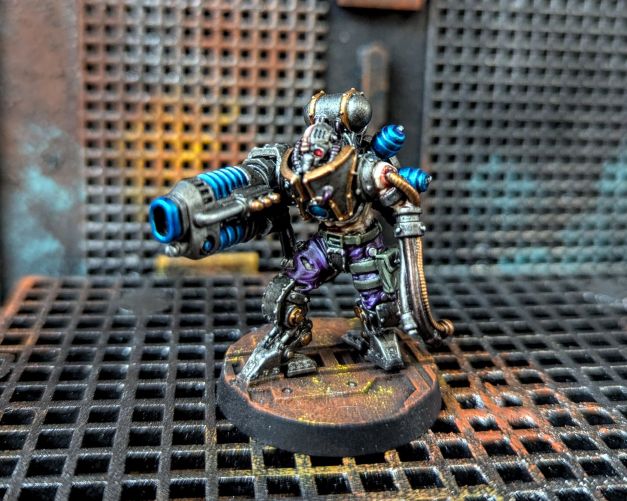
K-Vorst-14
K-Vorst-14 was first seen during the last days of Hive Sacrament, when the acrid smoke had reached the upper spires and the planetary governor was evacuating with his house guard. K-Vorst-14 rumbled through a sheet of flame and broke the defensive lines of the garrison protecting the landing pad, providing heavy fire support that allowed Draxus the Blighted Cog to cut his way into the data vault and make off with the sanctified cogitator array.
Upload Complete
Thanks for coming on this journey with me! I’ve been noodling on this warband for a few years now, and it’s nice to get all my ideas down on paper (so to speak). Particularly since the Dark Mechanicum don’t have a lot of official lore attached to them. (Again, that’s a feature, not a bug, in my humble opinion.) Look for these guys to feature heavily in our upcoming games!
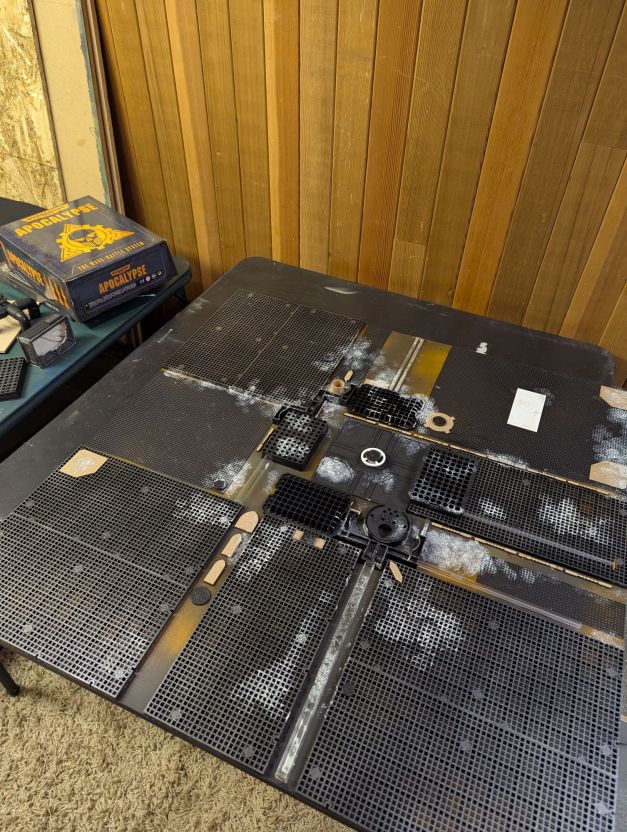
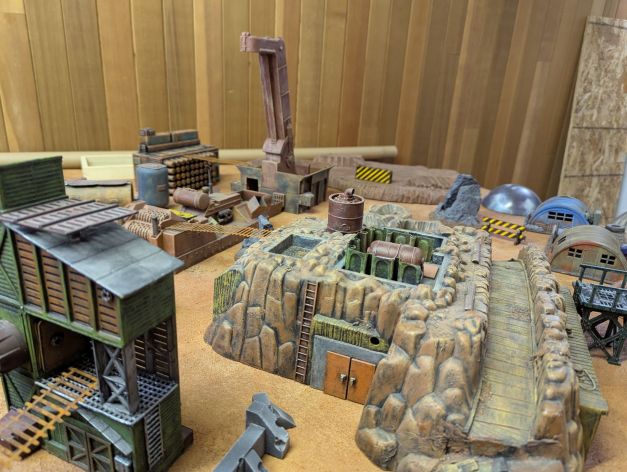
When you’ve been in this hobby as long as I have, you start to accumulate a lot of weird junk. Boxes of weird bits, curious packaging, interesting beverage lids, partitioned trays, textured plastic sheeting, that sort of thing. I’ve been dutifully collecting this flotsam for more than two decades, hauling it from house to house over the years, always adding, never subtracting, all with some vague idea that one day I would mash it all together with unhealthy amounts of glue and create some sort of grimdark Inq28-inspired sci-fi battle board.
Well, gentle reader, that day is today.
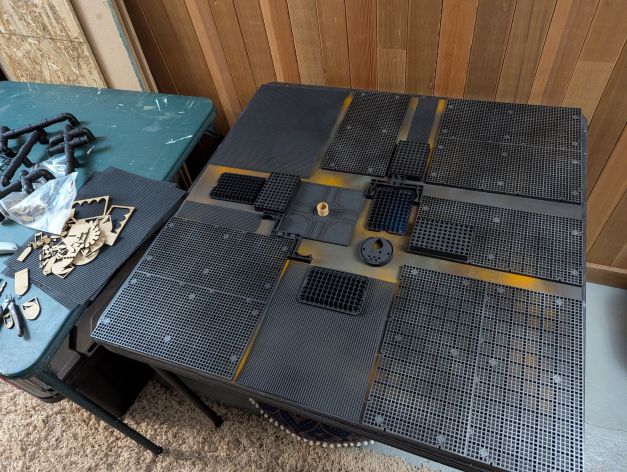
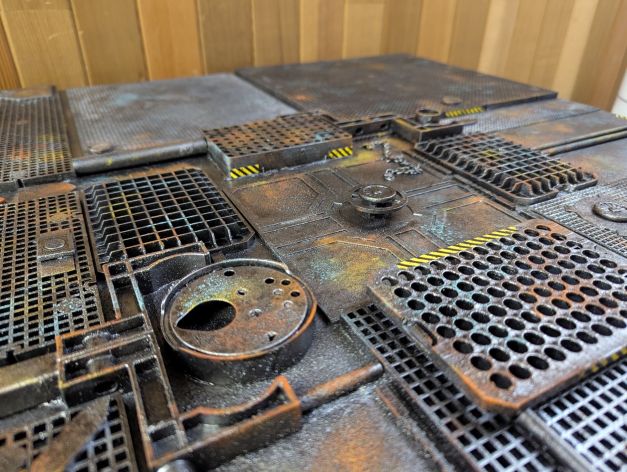
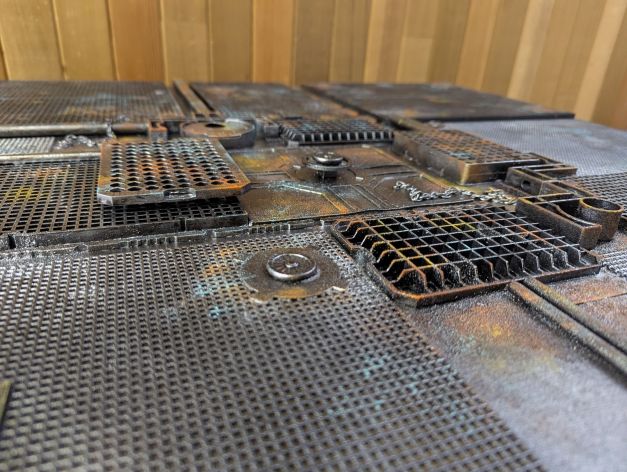
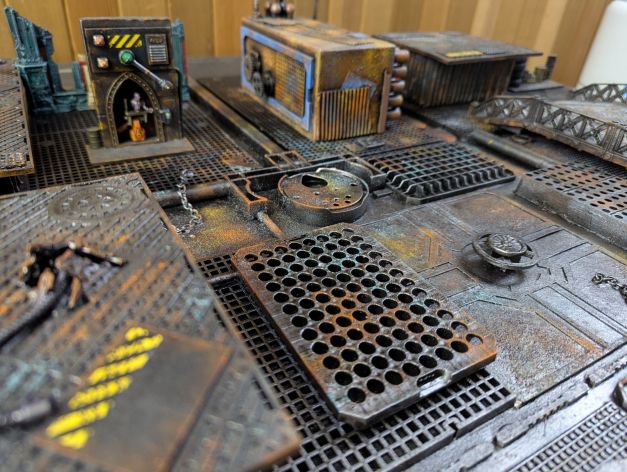
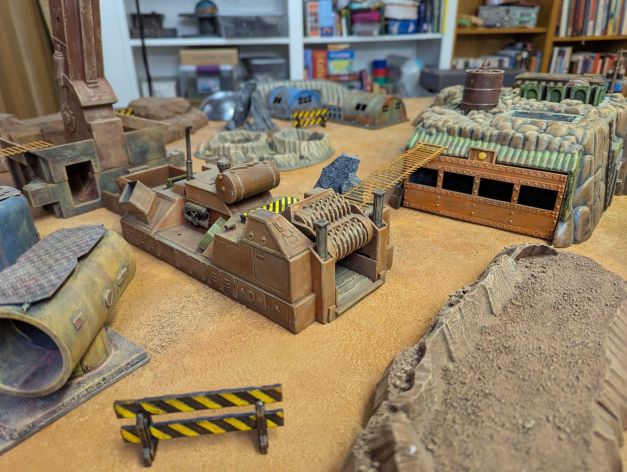
In recent years, I’ve scratchbuilt a table’s worth of rusted industrial terrain — platforms and barricades and control panels and pipelines — perfect for Inq28 and all manner of small-scale sci-fi skirmish games. The stuff looks nice on the tabletop, but what I’ve been missing was some sort of substrate to tie it all together … a game mat or prepared surface that finishes the aesthetic.
I always wanted to build a proper battle board, ever since I peeped a battle report from years ago, featuring some of John Blanche’s Inq28 warbands fighting it out in an oil-spattered Adeptus Mechanicus marketplace on some long-forgottten tech moon. The link escapes me, but maybe one of my faithful readers will dredge it up.
Anyway, my dream of building a proper battle board kicked into high gear when I was scrounging around a hardware store and found a beautiful slab of 1-inch MDF, cut to 32 inches square, calling my name like a siren at sea. At $1.75 out the door, I couldn’t beat the price.
It’s slightly smaller than I’d preferred (36 inches square would have been ideal) but beggars can’t be choosers.
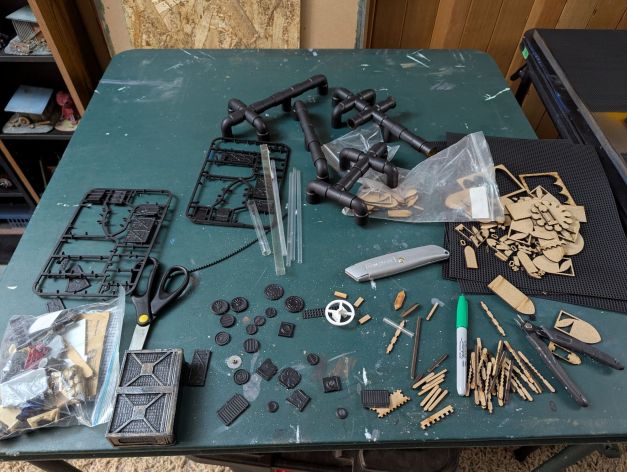
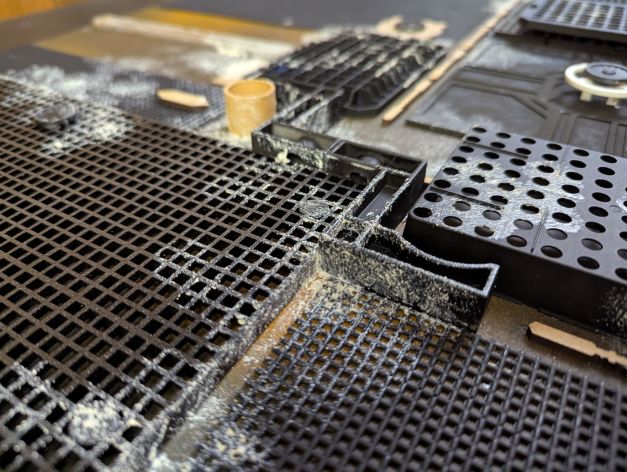
I sealed both sides with Mod Podge and set to work covering it with all manner of accumulated debris … cross stitch grating, aquarium filter panels, straws for conduit and piping, empty medical device cassettes, plus tons of off-cuts and leftovers from various MDF terrain projects. Truly, it was a deep dive to the very depths of my DIY terrain bins.
Once I glued the large pieces down, I turned my attention to the texturing. I planned to add some fairly intense rust effects, so I liberally applied texture paste, sand, and grout mix in a haphazard manner, aiming for a patchy finish.
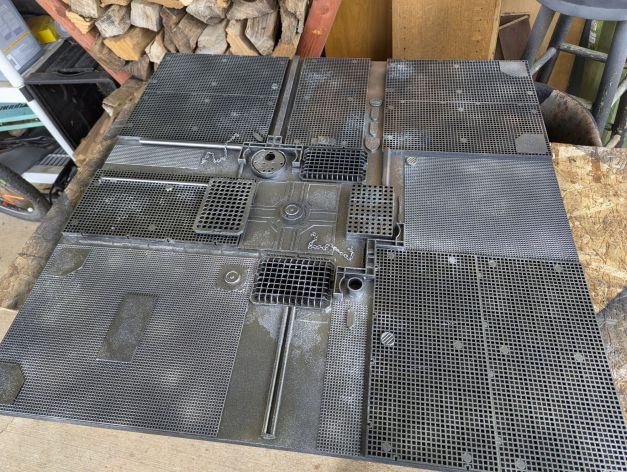
After that, the whole thing got several successive sprays of black primer, followed by metal spraypaint to give the whole thing a suitably sci-fi starting point.
A heavy black/brown wash followed the silver spray. It was a big bottle I’d mixed myself 10+ years ago, starting with Future Floor Wax and adding in brown and black paint plus water to create a rich, easy to apply wash for terrain projects. (It dries super fast, too, which meant this project could be accomplished in an afternoon.)
From there, I ripped up some chunks of old mattress foam and went to town with sponged-on rust colors: browns, ochres, oranges, as well as some weird turquoise to provide a little pop.
Trust me when I say that the sponged colors don’t look nearly so blotchy in real life. The silver base color really ties everything together.
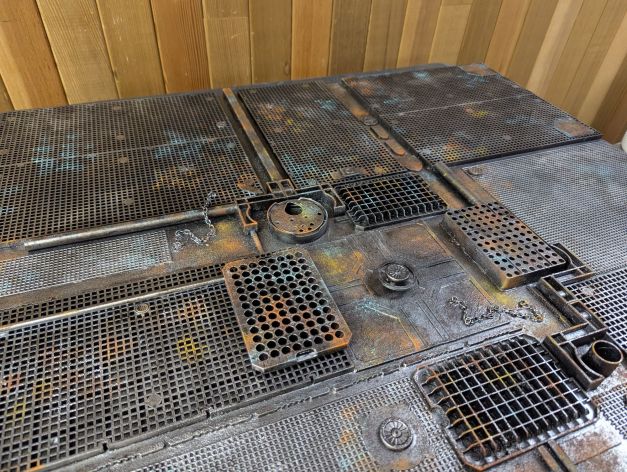
I affixed some hazard striping details in a few spots that are likely to draw the eye. (Sidenote: we no longer sully ourselves trying to paint hazard striping here at Comrade’s Wargames, not since we ran across a beautiful textured high-resolution printable JPG that will meet our needs for years to come). Grab it for yourself at the link below.
The sponging was quick and frighteningly fun — I always do my best terrain work with old brushes or chunks of sponge, the bigger the better. I’ll probably go through and pick out a few details for further brushwork at some point in the future (such as the chain lengths draped over various pipes and grates). But I’m quite pleased with how this turned out! I even took a moment to arrange some of my existing terrain collection on my new battle board, just to see how it all looks together.
Chef’s kiss, I’d say!
Now, I wish I could say that this terrain project used up all the trash and random junk I’ve accumulated over the years. But I would be lying if I said that. While I’m pleased to get some use out of this stuff, my total collection of detritus barely shrunk. Oh well! I’ll be well equipped the next time inspiration strikes.
We’ll put this battle board through its paces in a couple of weeks with Shadow War: Armageddon. Stay tuned!
I’m slowly working through my backlog of photos and content that I’ve been meaning to post over the last year or two.
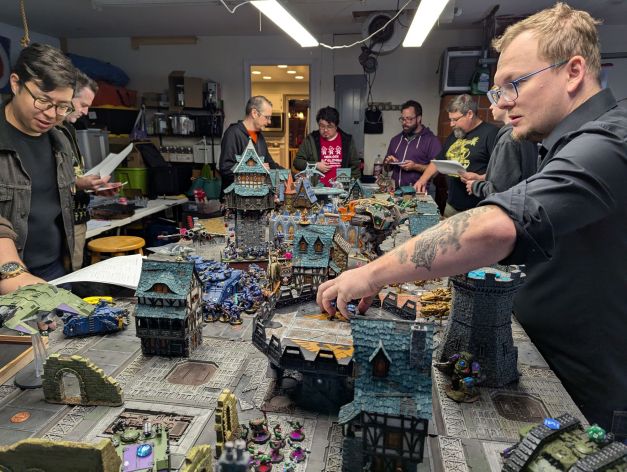
One such info dump is our annual 40k Apocalypse game, which took place in December 2024. We used Grimdark Future for our ruleset of choice, since it was quick and easy to pick up and play; it has served our group well over the years.
For the game, Paul and I set up a narrative scenario featuring the siege of Hundvolt, an Imperial feudal world that had unfortunately drawn the attention of the evil factions operating near Warzone Endymion. Here’s the capsule blurb we came up with:
The feudal world of Hundvolst has suffered mightily under the yoke of the Imperial tithe. For decades, village elders have watched as their sons and daughters were conscripted and shipped off planet. Now, the war has come to Hundvolst. Invading forces led by Heretic Astartes and foul xenos scum have laid waste to the planet even as Imperial defenders mount a dogged defense. Mighty armies churn the verdant soil of Hundvolst, reducing the planet’s forested hills and idyllic villages into charred rubble. The invasion is reaching its apotheosis. Imperial Navy ships, operating under a directive from the Ordo Malleus, have taken up station above the benighted planet. In mere hours, they will deliver the Exterminatus unto the cursed planet, scouring the surface of all life and rendering it inert and lifeless – such is the Emperor’s divine wrath. As the sun sets on Hundvolst, ragged Imperial units fall back to their evacuation sites. Several plucky force commanders stage a daring raid to liberate the knucklebone of St. Theodosia the Spiteful, seeking to spirit the saint’s relic away from the doomed planet and keep it from the vile clutches of xenos and heretic alike.
The scenario was intended to give us a reason to set up a weird mash-up of a feudal low-tech Imperial world being fought over by monstrous sci-fi war machines and armies. We wanted an excuse to set up a battlefield with our immense shared collection of gorgeous Tabletop World resin fantasy buildings, for one thing. We combined those with Daniel’s Sector Imperialis tiles to create a pleasing aesthetic.
The game itself was absolutely massive, with each player bringing about ~5,000 points of their respective factions. It was a glorious stew of beautiful models, vehicles, monsters, and war machines. All fully painted, as is our standard approach here at Comrade’s Wargames.
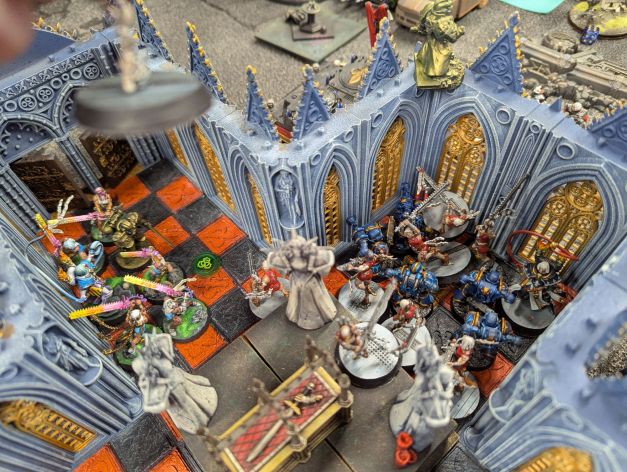
The cathedral in the building above housed the main objective — the knucklebone of St. Theodosia the Spiteful. The factions were competing to see who could seize the knucklebone before the virus bombs of the Exterminatus arrived to turn the surface of Hundvolst into a primordial soup of biological matter.
Here’s a peek at the action inside the cathedral. It was a bloodbath as the forces of Chaos tried repeatedly to gain control of the sanctuary, only to be pushed back by the combined guns of the Imperial Guard and Adeptus Sororitas!
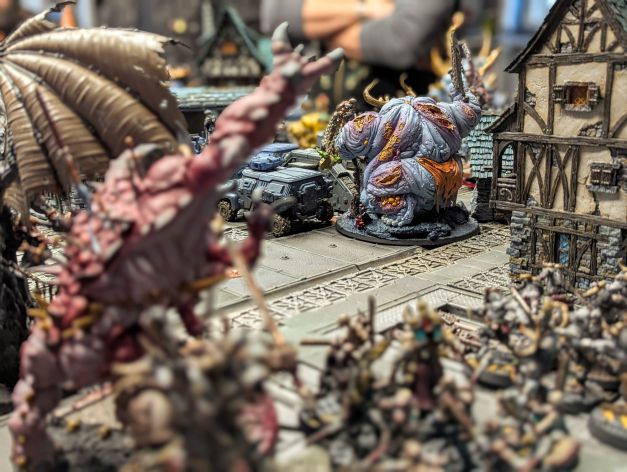
To be honest, I’m a year removed from the blow-by-blow action of the game, so it’s all a little hazy. I know we had some hot daemon-on-tank action, as seen below, followed by a gallant last stand by a gas mask-wearing commissar.
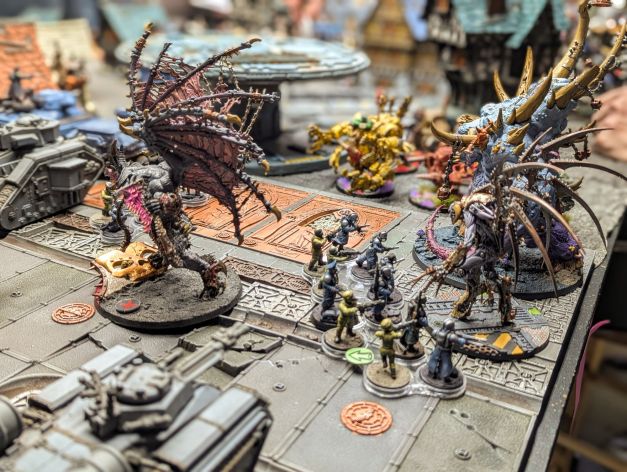
The streets nearer to the cathedral were choked with tanks as the heavy armor maneuvered for position. Troops scampered from cover to cover as the steel behemoths traded shots. The stone and thatch buildings provided tempting positions for heavy weapon squads, too.
The defenders of the Imperium — Astartes, Sororitas, Custodes, and Astra Militarum — mounted a brave defense, selling themselves dearly even as the clock ticked down toward the planet’s doom.
As the night wore on, the defenders rallied again and again in the face of the unending onslaught. But the forces of Chaos would not be denied their prize. Slowly, through gritted teeth and white knuckles, the defenders were pressed back and the attackers surged forward.
The battle reached its culmination as the forces of Chaos seized the knucklebone and began an extraction from the cathedral. Alas, this extraction turned into a rout as the combined forces of the Sisters of Battle and Imperial Guard fell upon the vile Heretic Astartes.
In a surprise no one saw coming, the defenders of the Imperium seized the holy relic, and an extraction squad managed to make it to a waiting Valkyrie gunship which lifted off mere moments before virus bombs rained down on the planet’s surface.
The image above shows the rearguard defending the landing site until the Valkyrie could escape. And then — a curtain was drawn back on the poor feudal world of Hundvolst, and no further missive is recorded herein about the fate of the world. Perhaps in a thousand years, Imperial surveyors might return and divine some clue about the ultimate fate of those trapped on the surface when the virus bombs fell. Or perhaps not.
Conclusion
As in years past, Grimdark Future gave us a great game that kept everyone engaged and rolling dice until the bitter end. We brought food and drink and enjoyed a meal together about midway through the game, as is our tradition with these end-of-the-year Apocalypse sized games.
And seeing as how I’m writing this in October, it’s a good reminder that we have just a few months before the next Apocalypse game. I’ll try to come up with a suitably epic scenario and tabletop setup, so stay tuned!
We have a penchant for old-school gaming here at Comrade’s Wargames, so it shouldn’t surprise anyone that I’ve been eager to try out Shadow War: Armageddon ever since I came across some blog posts and Youtube videos about how it’s been rediscovered lately as a diamond in the rough.
Now, don’t get me wrong — Shadow War isn’t an old game, per se. It was released in 2017, just before the debut of the revamped 8th edition of Warhammer 40,000. But it’s imbued with a certain old-school sensibility that appeals to me greatly. How, you might ask?
It’s essentially a re-skin of the venerable and popular Necromunda skirmish ruleset, which itself is derived from 2nd edition Warhammer 40k.
In my opinion, 2nd edition 40k is a lousy ruleset for army-scale games, but it’s ideal for skirmish level games, where each players controls about a dozen (or fewer) figures. The super granular statline for a typical figure makes sense when you’re only controlling a handful of dudes.
It’s one of the last (if not possibly the last) of GW’s one-book-is-all-you-need titles. The main book contained everything: core rules, army lists, advanced rules, campaign systems, etc. There were no extra books to buy, at all, ever. (Now you can see why GW has no interest in this type of approach.)
The core rulebook contains a dozen army lists covering most 40k armies, making it trivial to get players of all stripes interested in trying out the game.
Lately, as the increasing cost of models and rapid pace of rulebooks and supplements has increased the barrier for entry to the Warhammer hobby, players like me have been rediscovering older rulesets like Shadow War: Armageddon. To further illustrate the Venn diagram for you: I’m an avid enjoyer of One Page Rules, so I’ve never really been a participant in the current GW treadmill approach to game editions and rules supplements.
Anyway, enough of that preamble! You came to hear about the game, right?
John, Jim, and I got together last weekend to try out Shadow War: Armageddon. The core book doesn’t explicitly include rules for multiplayer games, but we are seasoned veterans of the wargaming hobby, so it was simple to adapt one of the rulebook scenarios to incorporate three players, all competing to accomplish little mini-missions on the tabletop.
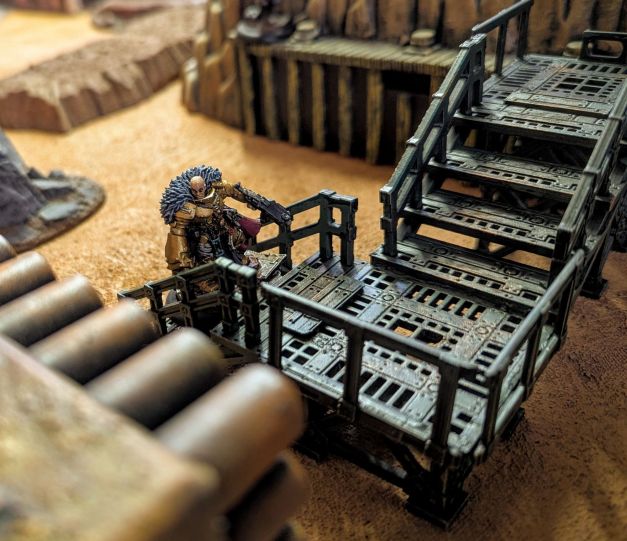
I set up a dusty, windswept desert battlefield replete with craggy rock formations and rusted industrial equipment. Here’s a look at the setup.
We played on a 4×4 battlefield, as advised in the rulebook. Weapon ranges are fairly short, and we concluded after the game that a 3×3 battlefield could easily have sufficed, even for our three-player game.
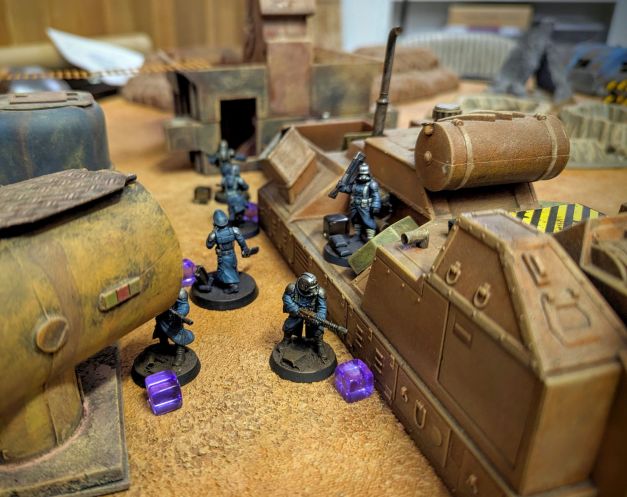
John fielded his grubby little Imperial Guardsmen, and Jim brought a stupendous number of Orks – 11 figures in total, I think. Contrast that with my Inquisitorial warband, which numbered 6 models. Yikes! Here’s a look at our factions as we started the game.
Prior to deployment, each player received a randomly determined mission objective.
John’s Guardsmen were trying to get across the board and exit from an opposing player’s deployment area.
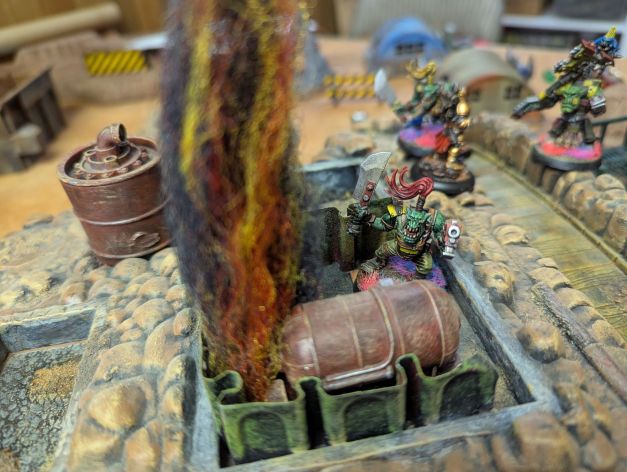
Jim’s Orks were trying to blow up a tank of promethium (the 40k equivalent of natural gas + gasoline + napalm, all mixed together and used for a variety of purposes).
My Inquisitor was trying to isolate and assassinate the Ork warboss.
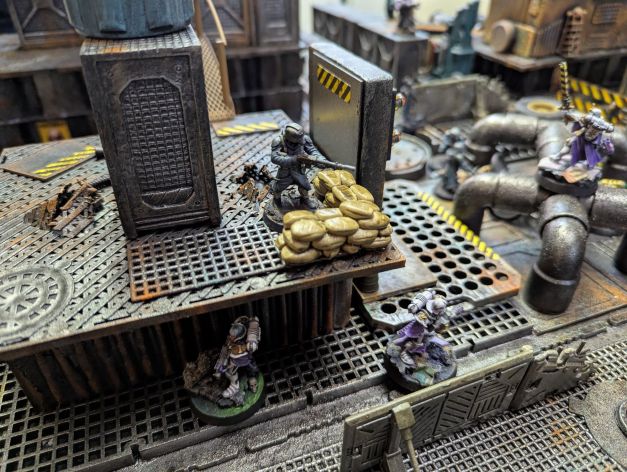
The game started with John’s Guardsmen moving purposefully through a narrow defile on the left flank of the industrial facility. They used the overwatch rule from Shadow War: Armageddon to great effect to cover their approach.
Waiting to meet them were Jim’s Orks, of course! He couldn’t just let those Guardsmen jog across the field unopposed.
The upcoming clash in this dusty back alley was one for the books. Stay tuned!
Meanwhile, Inquisitor Coteaz sent his warband up onto the central terrain feature — a craggy bunker defended by a trench and topped with (you guessed it) some promethium tanks.
From this perch, they could watch both of the opposing warbands as they jockeyed for position in the outskirts of the facility. I knew the Orks had to come my way to accomplish their mission, but I also didn’t want Jim to have to face John’s Guardsmen alone! So, in a burst of tactical genius, I split up my forces. You’ll see later how this played out for me.
But first — back to that alley. The Guardsmen were creeping along, covering their advance with overwatch, when suddenly a mob of Orks burst forth and charged them in true orky fashion!
It was an absolute bloodbath for the Orks. We learned a lot about the casualty system in Shadow War: Armageddon. You aren’t outright dead when you take a wound, but most of the time you’re in very bad shape, with just a slim hope for recovery on the battlefield.
Over by the promethium tanks, a brawl was developing as Jim charged his Orks up to assault the trench line. I had two models available to defend — Interrogator Lysander Frost and Virgil the Huntsman, who was armed (fortuitously) with a flamethrower.
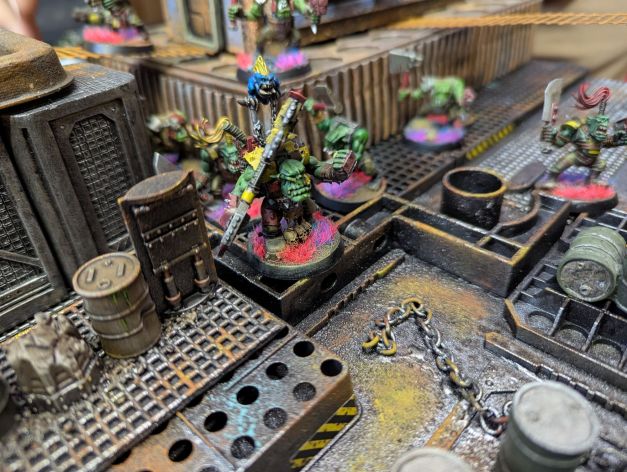
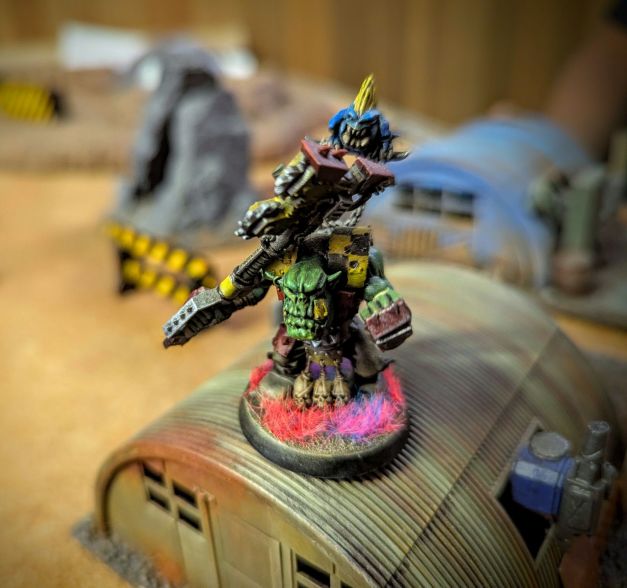
As this bloodthirsty scrum was developing, Jim’s warboss bravely stepped out of hiding and entered the fray. He started by throwing grenades, then decided to wade into combat and try to draw off some Inquisitorial acolytes.
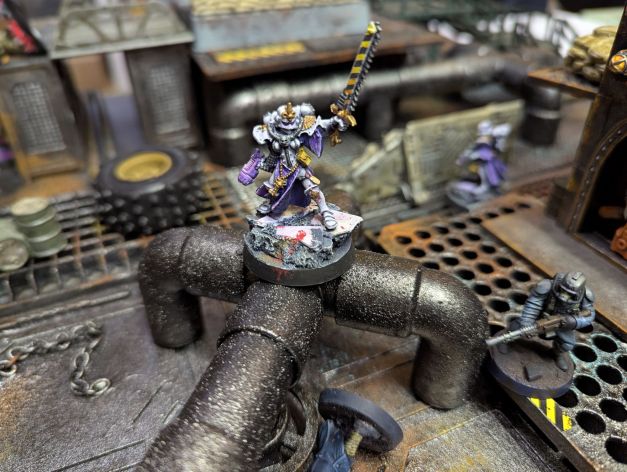
As it happened, the warboss ended up within charge range of Inquisitor Coteaz! This was literally my game objective — slay the opposing leader! I couldn’t let a chance like this pass by.
Throwing caution to the wind, Inquisitor Coteaz raced into combat against the warboss. For a turn or two, it was a fair fight… we traded blows but no one seemed to gain the upper hand. Once some more Ork boyz joined the fray, things went sideways quickly for the Lord Inquisitor.
Here’s his final stand, just before he was cut down in single combat.
Luckily, his broken body was spirited away by Interrogator Lysander, to be healed and restored to the Emperor’s service.
In doing so, Lysander’s attention was taken away from the Ork boyz scrambling up the hill toward the promethium tank. Oops!
All it took was a tiny little distraction to seal the deal for Jim’s Orks. This silly Ork warrior blew up the promethium tank in a fiery explosion, ensuring victory for the greenskins even as the Imperial factions retreated to lick their wounds.
Feedback from the guys for Shadow War: Armageddon was generally positive. “It definitely scratched an itch,” was how Jim put it after the game. SW:A had all the accoutrements that would normally turn me off from a GW game: super granular stats for figures, weird corner case rules like ammo rolls and crawling 2″ per turn when wounded, inexplicable wargear missing from the army lists.
But I’ll be honest with you — it works. The whole package plays smoothly and is imbued with a healthy dose of nostalgia. The clunky parts are a glorious love letter to earlier editions of Warhammer 40k. And it’s such a small scale game that you just don’t mind flipping through the rulebook to uncover mundane rules for grenade deviation or melee attacks on pinned models.
For me, the most appealing factor is the “one rulebook is all you need” approach. The rulebook is out of print, but PDFs can be found without a lot of effort. And that’s it — no further buy-in is needed. The rulebook contains army lists for nearly every 40k faction you might want.
So we’ll be playing this one again, for sure. In fact, we’re already discussing a campaign to see how our little warbands can level up and improve their position. Stay tuned for more!


